
I started painting rocks a few years ago when I wanted something easy to do on weekends.
It does not take much space or money and the results can look nice around the house.
Over time I have tried different designs and found some that are simple enough for anyone to try.
Here are some ideas that might work if you are just getting started with this kind of project.
I like how these can add a bit of color to my garden or shelves without a lot of effort.
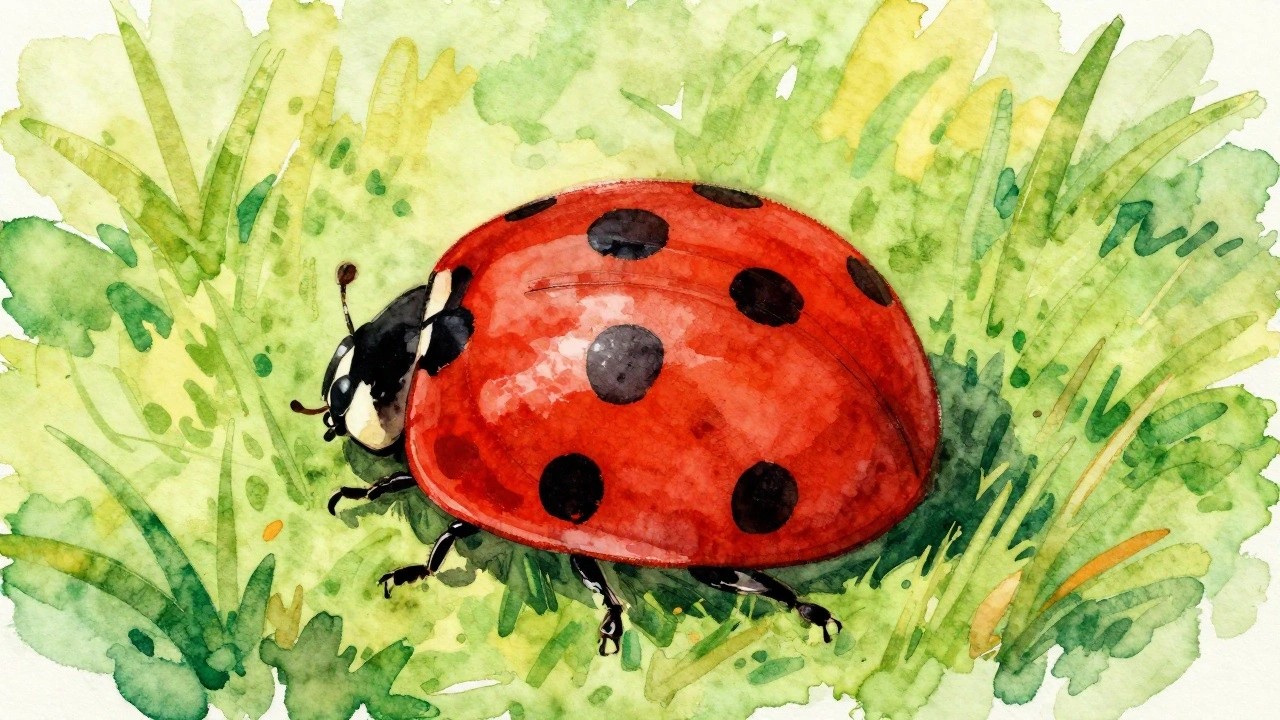
Ladybug Painted on a Smooth Rock
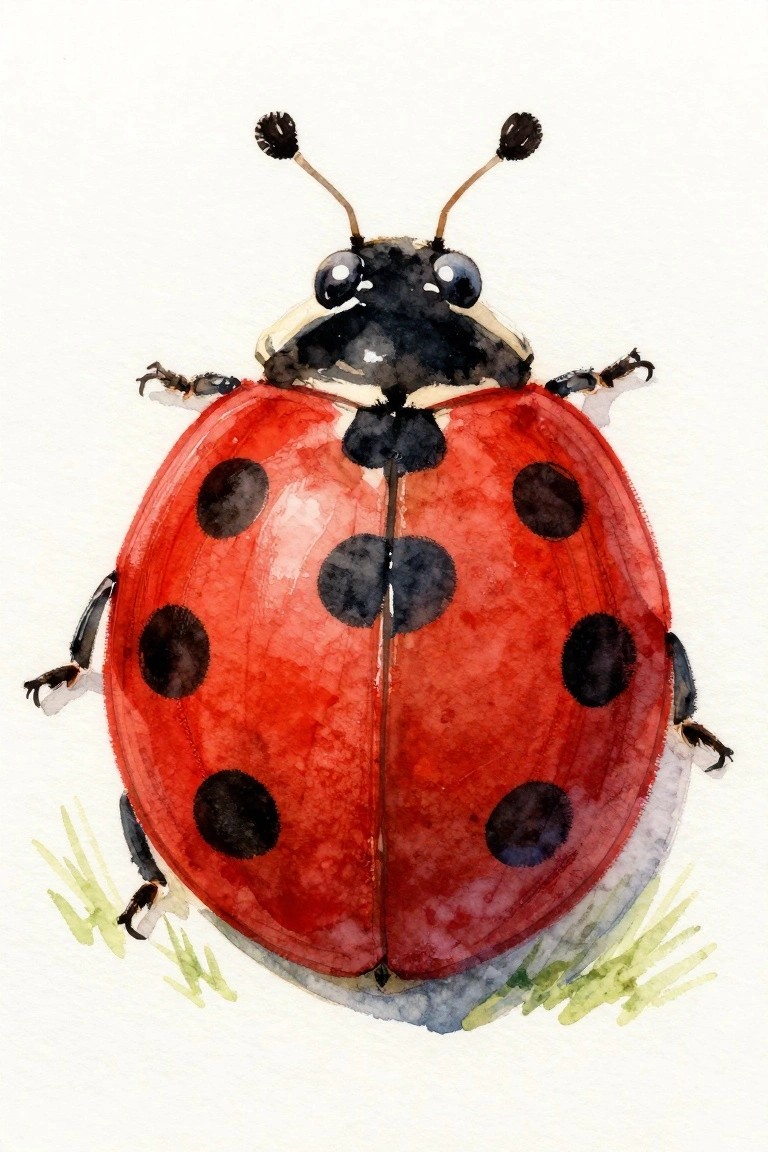
A ladybug rock painting uses the natural round shape of a stone as the beetle’s body. The design features a bright red shell split down the middle with evenly spaced black spots, a black head section with small white highlights, and thin legs and antennae extending outward. Simple green grass strokes at the base ground the insect without crowding the main subject.
What makes this idea useful is how the rock’s curve already suggests the ladybug’s form, so you mainly need to handle the color blocks and spots. The limited palette of red, black, and a touch of green keeps the project quick to finish and easy to repeat on several stones for garden borders or gifts. You can reduce the number of spots or skip the grass if you want a faster version, and the clear silhouette still reads well from a distance on a shelf or path.
Smiling Cloud with Rainbow

A friendly cloud face with simple dot eyes and a curved smile sits below a rainbow built from stacked color bands. The design uses rounded cloud forms and arched stripes to create an easy focal point that fits naturally on an oval or round rock. Soft color blending in the rainbow and a light background keep the whole piece balanced without crowding the surface.
The rounded cloud shape works especially well on smooth rocks because it needs only basic curves and minimal layering. You can swap in fewer rainbow colors or leave the cheeks out to make the design quicker for practice runs. Bright stacked bands like these show up clearly on painted rocks used as garden markers or desk accents.
Rainbow Mandala Rock Painting
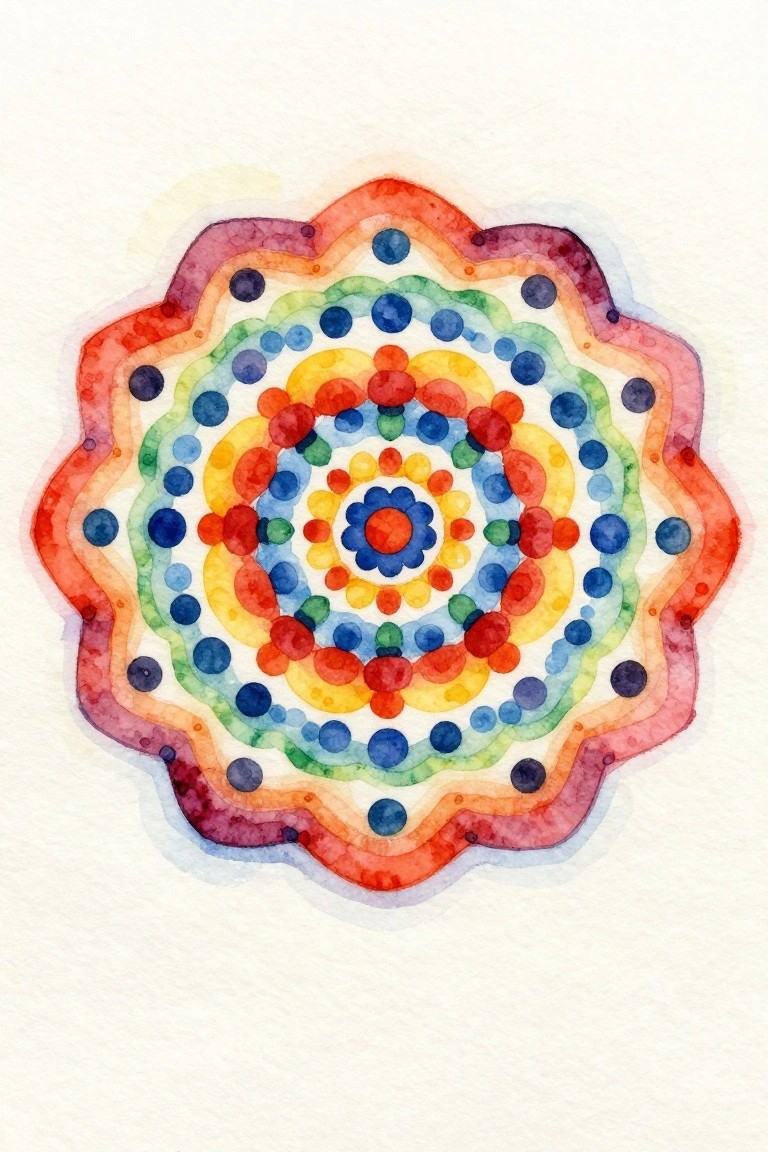
A mandala built from concentric rings lets you turn a round rock into a balanced decorative piece by working outward from the center. Each ring uses a different color from the spectrum while dots placed between the bands add texture and keep the design from looking too flat. The scalloped outer edge gives the finished rock a soft flower-like shape that stands out when grouped with other painted stones.
The composition does a lot of the work here because the repeating rings guide your brush and make placement feel natural. You can simplify the idea by using fewer rings or change the color order to match a specific room or season. This kind of pattern shows up well in photos so it works nicely for Pinterest posts or small gifts.
Ocean Sunset with Breaking Waves
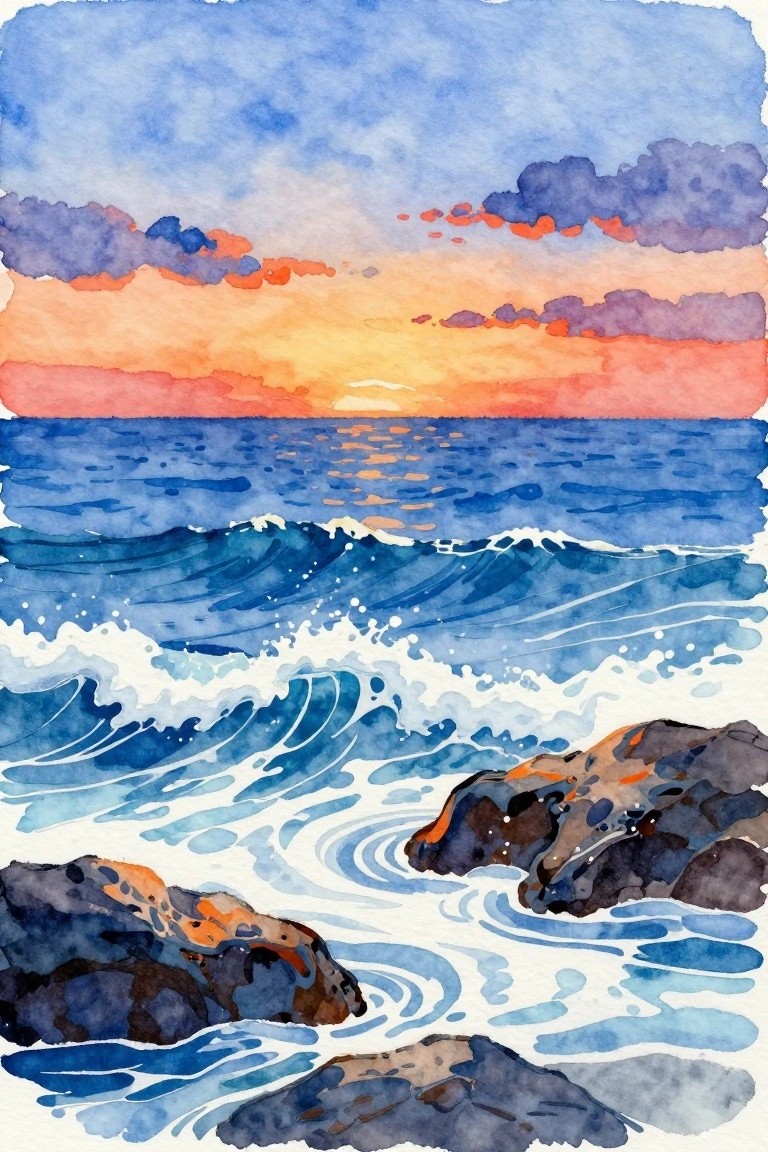
A landscape painting idea centered on a sunset ocean scene works by stacking the sky, horizon, and foreground rocks in clear horizontal bands. The main focus stays on the waves rolling in with white foam edges while the sunset colors reflect across the water surface. This approach uses a limited palette of warm oranges fading into deep blues to keep the composition balanced without needing lots of extra detail.
What makes this idea useful is the strong horizon line that gives you an easy starting point for sketching proportions. You can scale it down for smaller canvases or stretch the sky area if you want a taller piece for wall decor. Adjusting the rock shapes or wave height lets you personalize it quickly while keeping the same sunset color flow. For practice, this kind of subject helps you work on blending and simple layering without requiring fine brush control.
Succulent Painted on a Rounded Stone Base
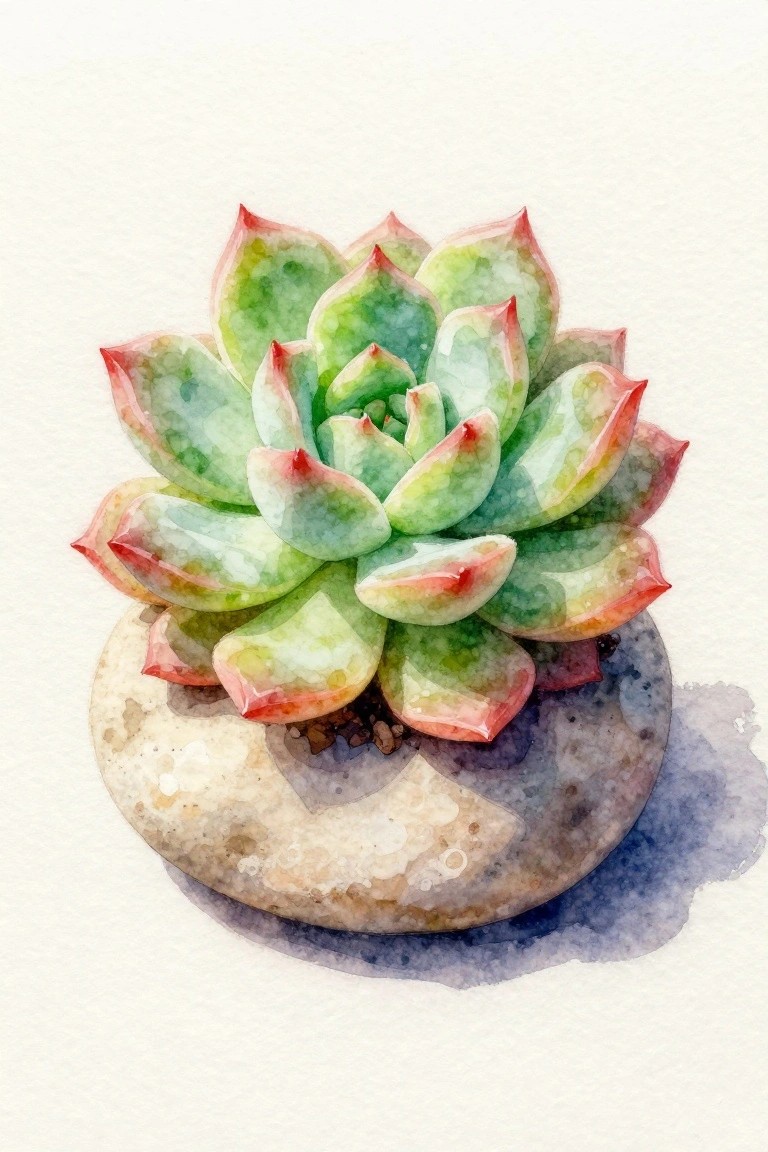
Painting a succulent onto a smooth rock uses overlapping leaf shapes in soft greens with red-pink tips to build a compact plant form. The design sits the finished succulent on a larger flat stone, turning the whole piece into a small tabletop accent that mimics a potted plant. This approach belongs to decorative plant-themed rock art, where the rounded leaf layers and gentle color shifts create interest without tiny details.
The natural curve of the rock already supplies the plant’s container shape, so you only need to focus on the leaves. You can change the palette to match other succulents you see in stores or swap the base stone for a different size to fit a shelf or desk. This kind of subject works especially well for beginners because the overlapping ovals hide small mistakes and still read clearly from a distance. For wall art, something like this photographs cleanly on a plain background, which helps it stand out if you want to share finished pieces online.
Spiral Galaxy Rock Painting

A spiral galaxy gives you a strong focal point for rock painting by using concentric swirls that naturally follow the shape of most stones. Build the design with soft color layers in blue, pink, and purple so the arms appear to overlap and create depth without needing precise lines. The bright center acts as an easy anchor while the outer edges fade into the rock surface for a clean finish.
The composition does a lot of the work here because the spiral guides your brush direction and hides small mistakes in the blending. You can simplify the idea by using fewer color bands or enlarge it across a bigger stone for more dramatic wall display. This approach stands out on Pinterest since the space theme reads clearly even from a distance and adapts easily to whatever paint colors you already own.
Sunflower Design for Painted Rocks

A sunflower works well as a rock painting subject because the main bloom uses a simple circular center surrounded by radiating petals in a bright yellow palette. This floral approach relies on layered petal shapes and a textured seed area to create visual interest without needing fine detail work. The composition stays balanced by keeping the flower large on the rock surface with just a few leaves at the base.
What makes this idea useful is how the bold petal shapes scale easily to fit oval or round rocks of different sizes. The strong yellow and brown contrast helps the design read clearly even on textured stone. For practice, this kind of subject lets you repeat the same flower while changing the petal angle or leaf placement to make each rock unique for garden decor.
Painted Cactus Trio on Rocks
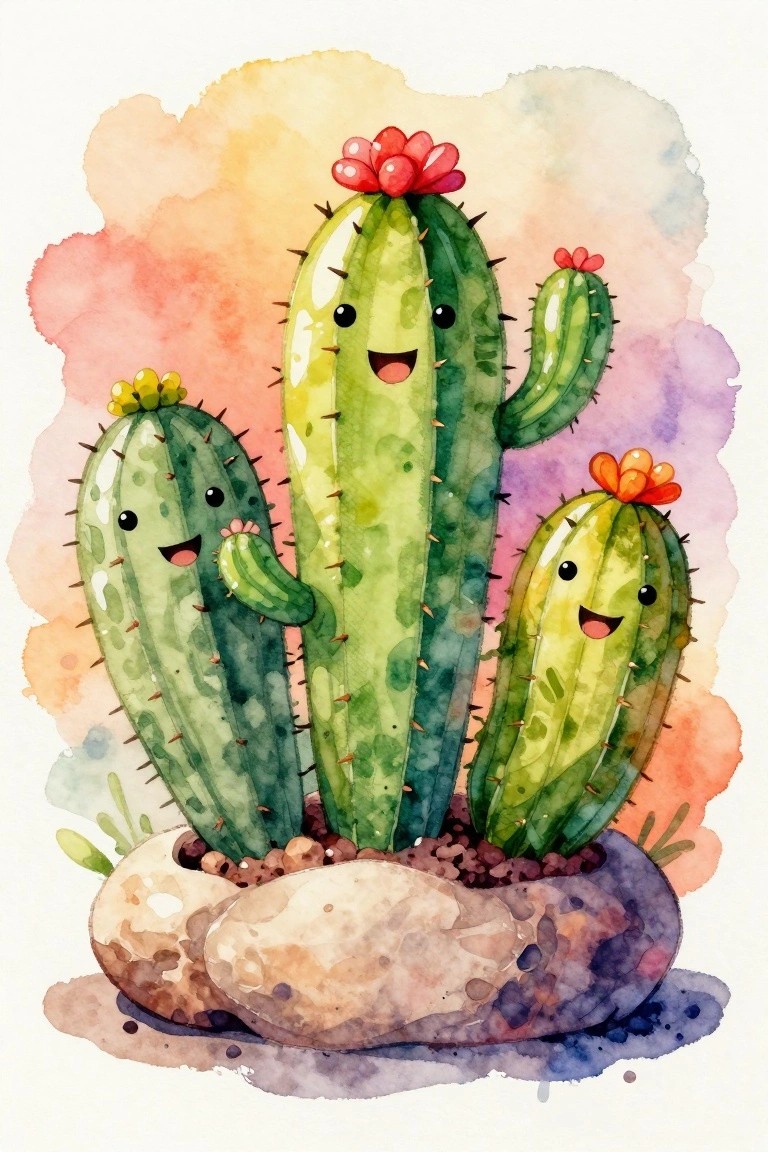
Painting a small cluster of cacti on separate rocks lets you use their natural shapes to form the bodies while adding simple lines for spines and a few dots for faces. The rocks are grouped on a larger base stone to look like a single potted arrangement, with different sizes and slight tilts creating visual variety. Bright flower tops in red, orange, and yellow break up the green and keep the focus on the top of each cactus.
What makes this idea useful is how the rounded rock forms already suggest cactus bodies, so you only need basic color blocking and a few thin strokes to finish them. You can scale it down to two cacti or expand it with more rocks depending on what you have collected. The same layout works for a windowsill piece or a small gift by swapping flower colors to match a room or season.
Cute Penguin Rock Painting
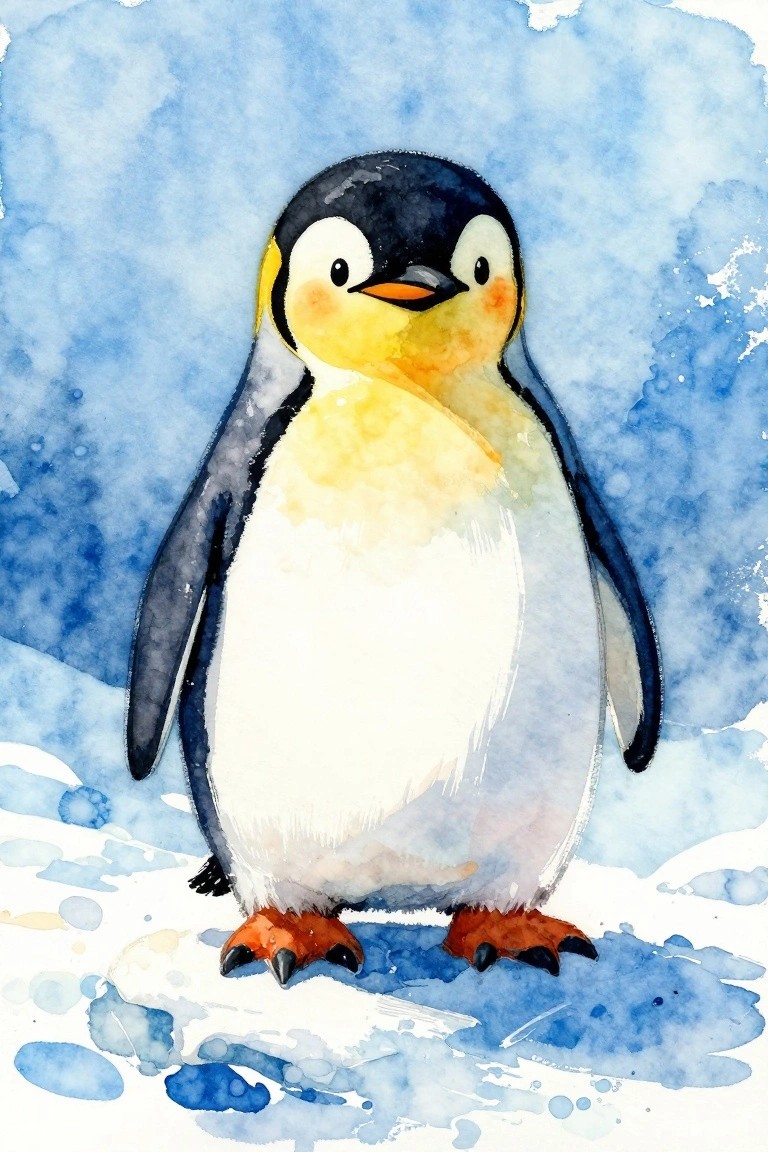
A penguin makes a strong choice for a beginner rock painting because its rounded body and clear color blocks create an easy-to-follow shape. The idea centers on a standing penguin with a black back, white belly, and soft yellow face highlights against a simple blue or white background. The composition works well because the subject fills the space without needing fine details, letting bold color areas and a few accent lines define the form.
What makes this idea useful is how the basic oval body and flipper shapes translate directly onto smooth rocks of different sizes. You can keep the palette to black, white, orange, and a touch of yellow so it stays beginner friendly while still looking finished. This kind of subject works especially well for winter decor or small gifts since the design stays recognizable even when simplified. For practice, start with the body shape first and add the face details last so the proportions stay balanced.
Geometric Crystal Rock Cluster

Paint smooth rocks with bold geometric patterns such as stripes, triangles, and angular lines in bright, saturated colors to give them a faceted crystal look. Group the rocks at different angles so the shapes overlap and create depth in a compact arrangement. This approach turns basic rock painting into a still life style project that relies on color contrast and simple shapes rather than detailed scenes.
The composition does a lot of the work here by letting the varied rock sizes and tilted angles add interest on their own. You can scale it down to three rocks for a quicker version or swap in any color scheme to match your space. For wall art, something like this photographs well and gives you a reusable template that works on stones of almost any size.
Fox Face on an Oval Rock
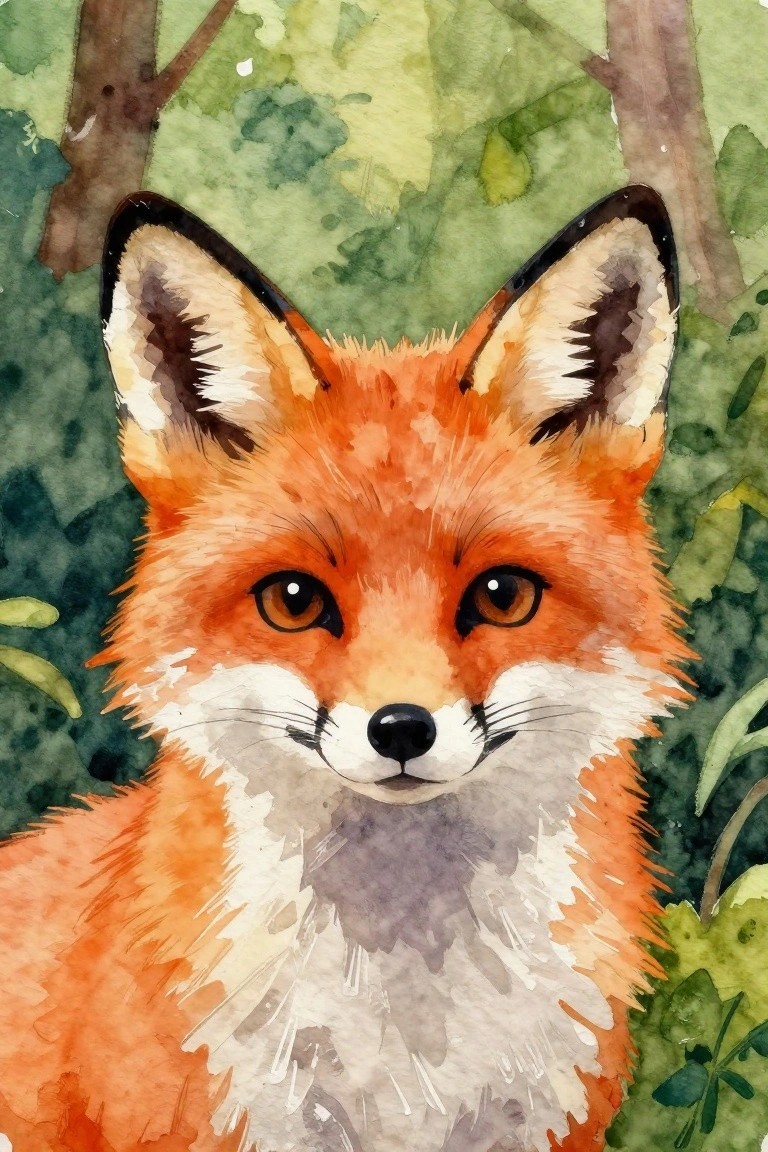
Painting a fox portrait on a rock uses a rounded stone as the base for the animal’s head, building up layers of orange for the fur and leaving white areas for the chest and inner ears. The idea centers on a close-up animal face with dark accents around the eyes and nose to create contrast, plus a few simple green shapes in the background to hint at leaves or trees. This approach works as an animal category project because the natural rock shape already supports the head outline without needing complex outlines or extra space.
The composition does a lot of the work here since the fox fills most of the surface, so you can match the rock size to whatever you have on hand. You can drop the background details for a faster version or add them with a small brush if you want more depth. This kind of subject stands out for garden decor or gifts because the bold orange against the stone color catches attention quickly.
Blended Watercolor Rock with Gold Flecks
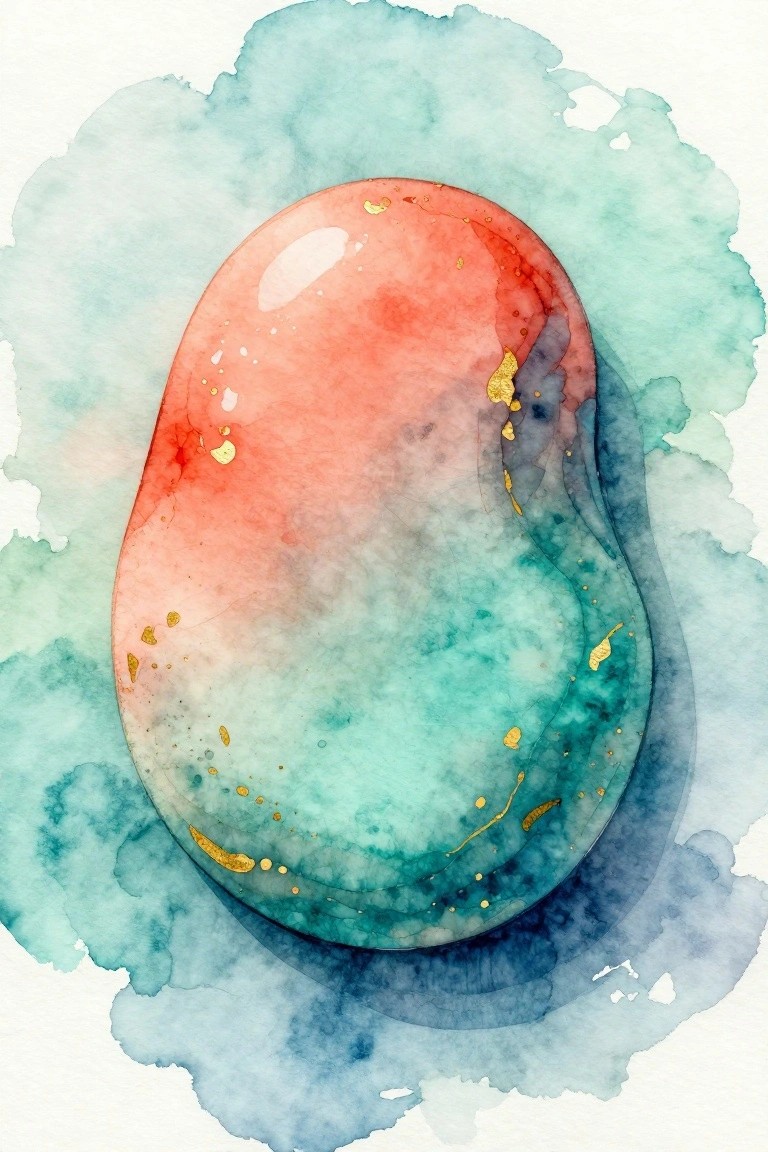
Painting an oval rock with a smooth transition from coral red at one end to teal blue at the other gives an abstract watercolor look without needing precise lines. Small gold flecks placed along the color edges add contrast and catch light on the curved surface. The idea fits into decorative art because the fluid blend relies on the rock’s natural shape rather than detailed drawing.
The composition does a lot of the work here since the oval form already directs the eye through the gradient. You can swap the coral and teal for any two colors that shift gradually and repeat the gold flecks on a few rocks to make a small collection. This would be easy to turn into shelf decor or paperweights since the technique stays loose and works on rocks of different sizes.
Hedgehog Portrait with Layered Spines
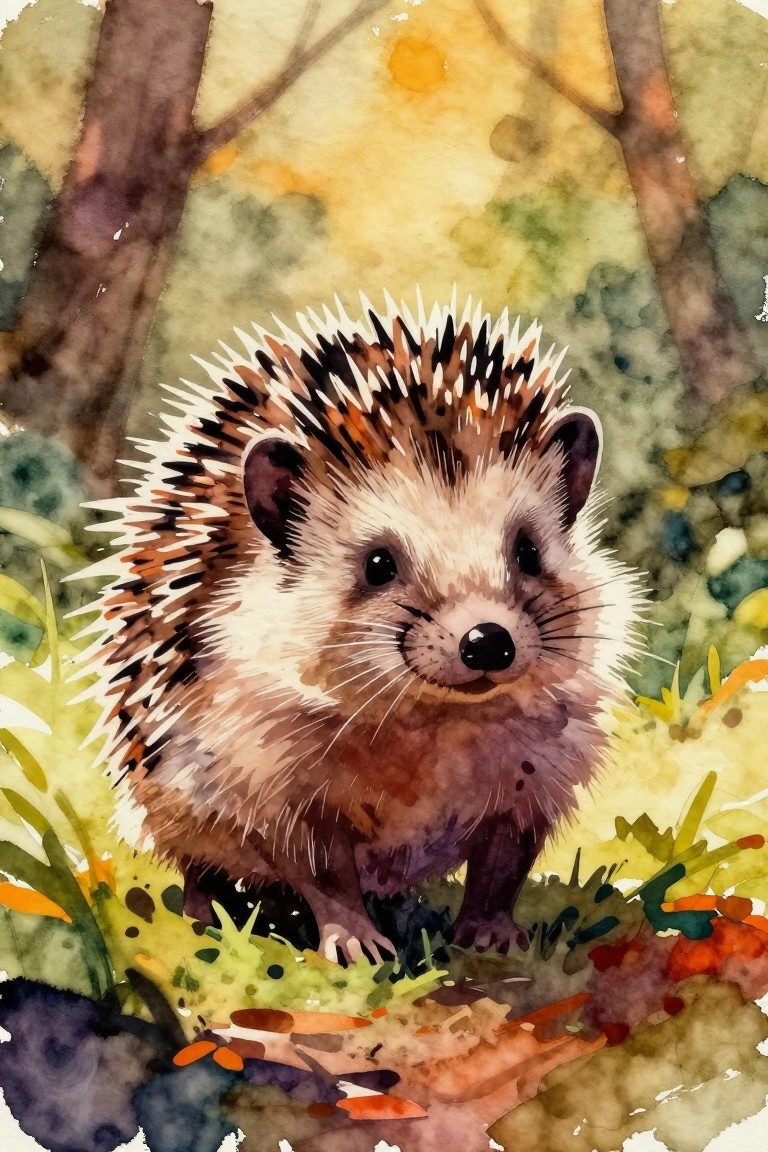
A hedgehog works well as a rock painting subject because its compact body and spiky outline fit neatly on oval or rounded stones. The idea centers on building the spines with short, directional strokes in brown and black tones while leaving the face in lighter shades to create contrast. Adding a few leaves and twigs at the base helps suggest a natural setting without needing a full scene.
What makes this idea useful is that the main shape stays simple enough to sketch quickly before adding texture. You can scale the design down for smaller rocks or stretch the background elements if you have a larger surface. The limited color palette also makes it easy to match whatever rock colors you already have on hand.
Bee on a Honey Covered Rock
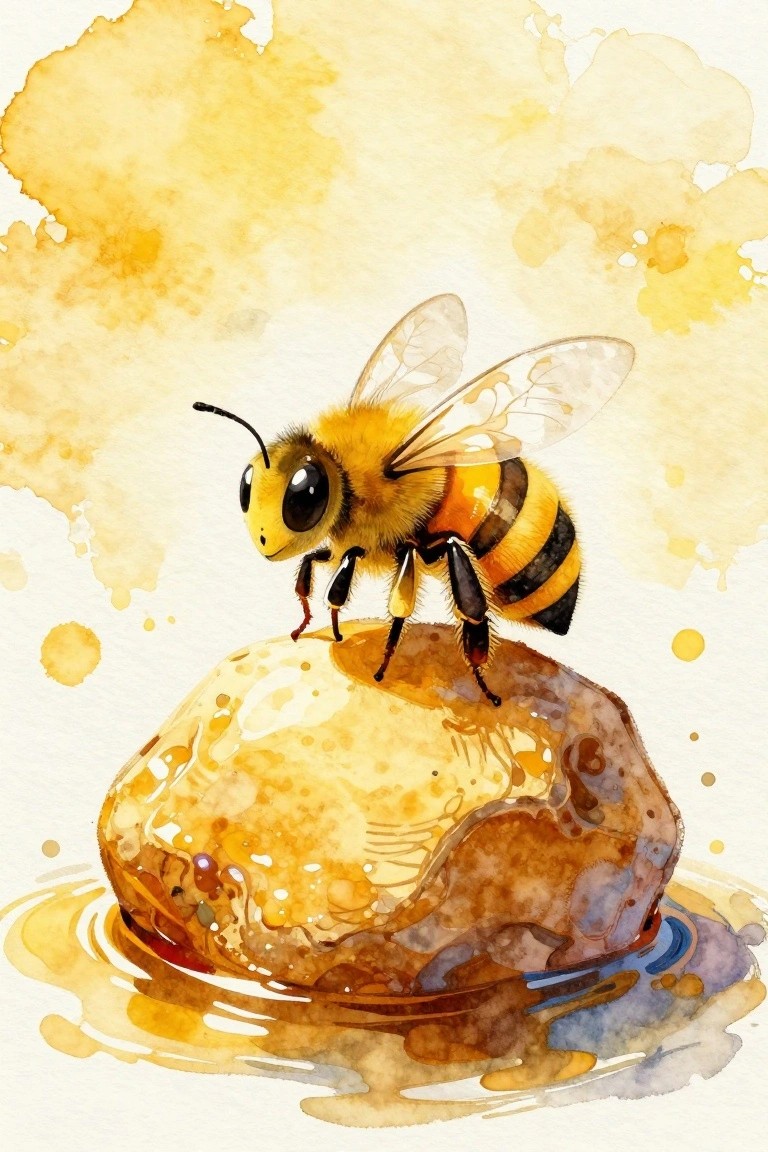
A painting idea that pairs a bee with a rounded rock coated in dripping honey creates a compact animal and still life mix. The bee sits centered on the glossy surface while the honey pools and drips down the sides, giving the rock a wet, reflective look. A soft yellow wash in the background keeps the attention on the bee and the shine of the liquid without adding extra elements.
The composition does a lot of the work here by using the rounded rock shape as a ready-made base and the honey as built-in highlights. You can adapt the idea by painting it directly onto a smooth stone or by simplifying the drips if you want a faster version. The color palette of yellows, oranges, and browns makes it easy to match with other nature subjects or to adjust for different seasons. This type of close-up subject shows up well on Pinterest because the contrast between the fuzzy bee and the glossy surface reads clearly even at small sizes.
Stacked Painted Stones Tower

A vertical stack of five oval stones painted in soft watercolor blends creates an easy decorative project that relies on color layering instead of detailed drawing. Each stone gets its own muted palette with warm and cool tones mixed together, plus scattered speckles that add texture. The simple oval shapes and balanced arrangement let the colors do most of the visual work.
What makes this idea useful is how quickly the color choices can shift to fit different rooms or seasons without changing the layout. The rounded forms keep the focus on blending practice rather than outlines, so it works well as a low-pressure way to test watercolor techniques. You could shrink it to three stones for a faster version or paint the same stack on actual rocks for a mixed-media piece that stands on a shelf.
Jack-o’-Lantern Pumpkin Design
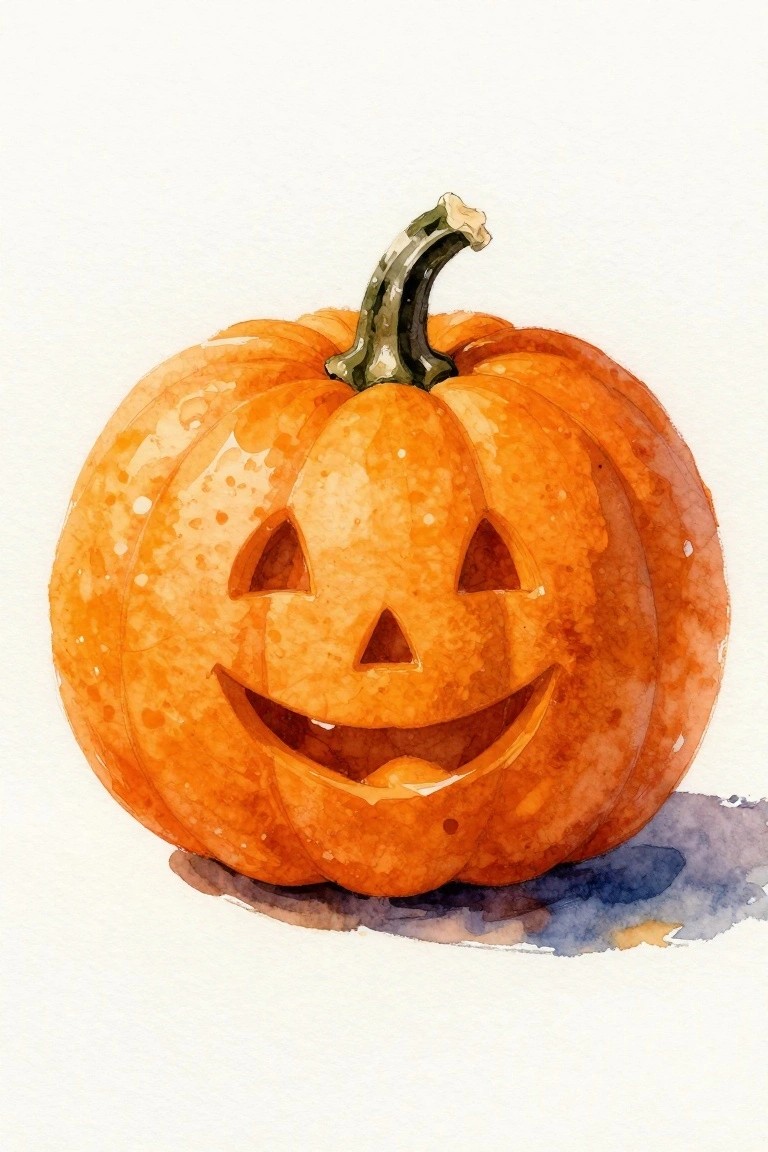
A jack-o’-lantern painting idea uses the natural round shape of a rock to represent a carved pumpkin for Halloween. The design relies on simple triangular cutouts for the eyes and nose plus a wide curved mouth to form the face. This seasonal approach fits into still life or decorative art and works with a limited orange and green palette plus basic layering for the stem.
What makes this idea useful is how the rock’s form already supplies the pumpkin body so you only need to add the face details. The color palette stays straightforward with a few orange shades and a darker stem accent that adapts easily to whatever paints you have on hand. This subject works especially well for quick fall decor pieces or small gifts since the shapes stay bold even on smaller rocks. For practice you can start with the basic face layout then adjust the mouth curve or add light texture spots if you want more variation.
Colorful Fish Rock Painting
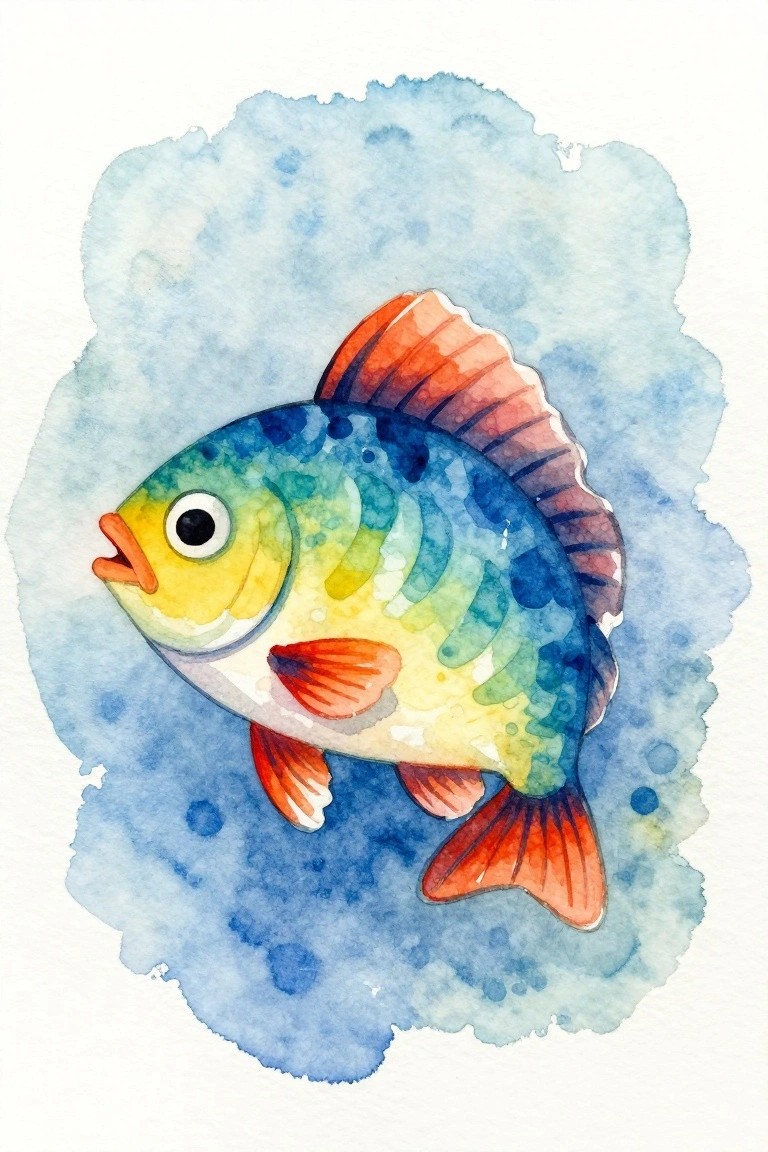
A fish painted with overlapping sections of blue, green, and yellow creates a simple yet eye-catching design that works well on smooth, rounded rocks. The body shape stays easy to outline first, then filled in with broad color areas before adding the orange fins and tail as accents. This approach keeps the focus on the fish itself while the soft background wash helps the whole piece sit nicely on the stone without extra details.
What makes this idea useful is how the rounded body and fin layout adapt to rocks of different sizes without losing the main shape. You can drop some of the scale patterns or limit the color shifts if you want a faster version for multiple stones. The blocky color sections also make it simple to swap in colors you already have, and the design stays clear enough to read from a distance when used as shelf or garden decor.
Red Spotted Mushrooms on Mossy Rocks
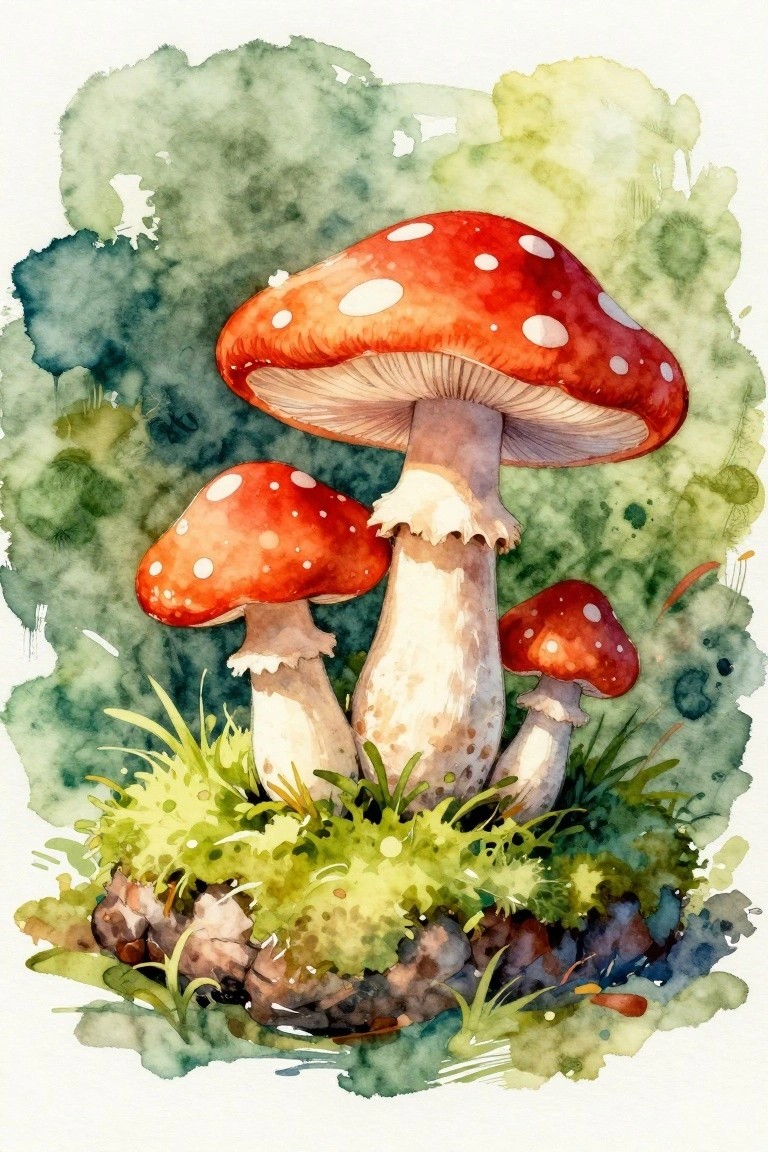
Mushroom painting ideas like this one focus on a small cluster of different sizes to create a natural grouping. The bright red caps with white spots stand out against loose green washes that suggest moss and leaves without needing fine detail. Varying the stem heights and angles helps the composition feel balanced while keeping the shapes straightforward to paint.
What makes this idea useful is that the round cap forms are simple to block in first, and the white dots can be added last for quick contrast. You could adapt the same layout to a single larger stone or spread it across several smaller ones for a set. The soft background keeps the focus tight on the mushrooms, so the idea works on both flat canvases and rounded rocks without extra elements.
Layered Rainbow Hearts on a Painted Rock
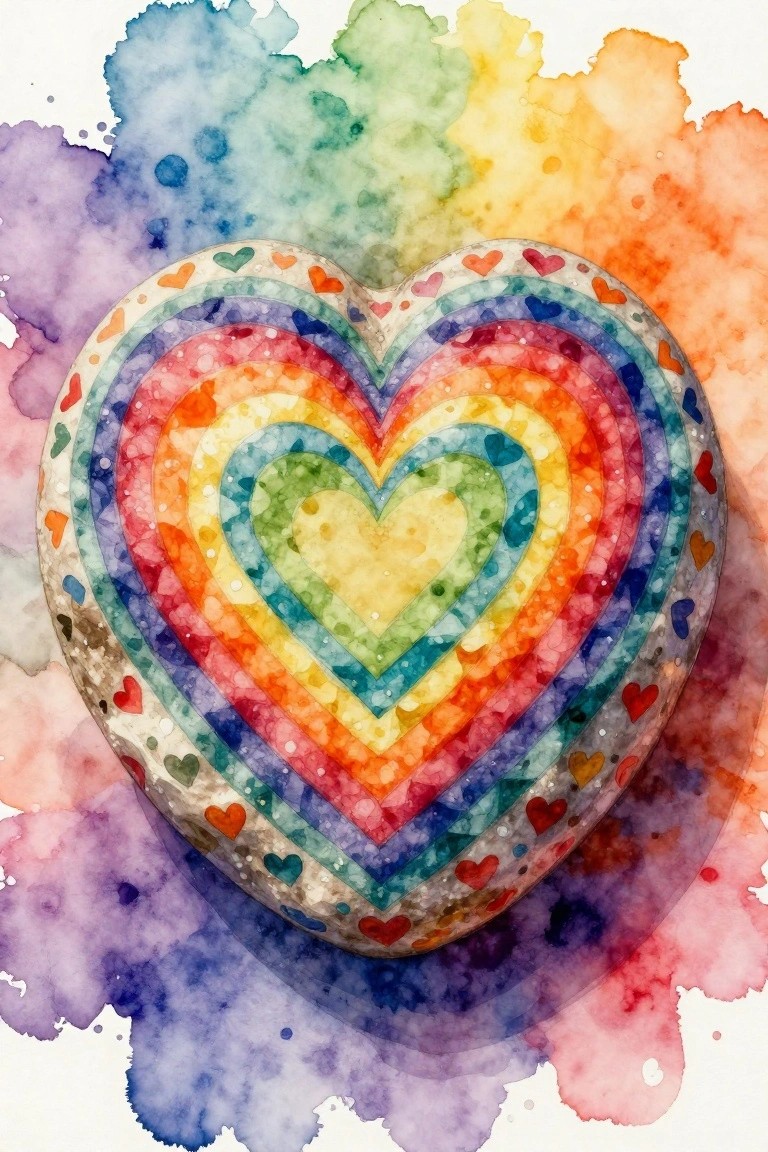
Painting a rock with nested hearts in rainbow order gives you a bright, graphic design that works from any angle. The colors build outward from the center in clean bands, and the small hearts scattered around the edge create a simple frame without adding much extra work. This approach falls under decorative art because it relies on shape repetition and color blocks rather than fine detail or realism.
The repeating heart shape keeps the layout easy to plan even on an uneven surface. You can reduce the number of rings for a faster version or change the color order to match a holiday or room theme. The design also photographs well for sharing, which helps it perform on Pinterest when shown against a plain or lightly textured background.
Constellation Crescent Moon
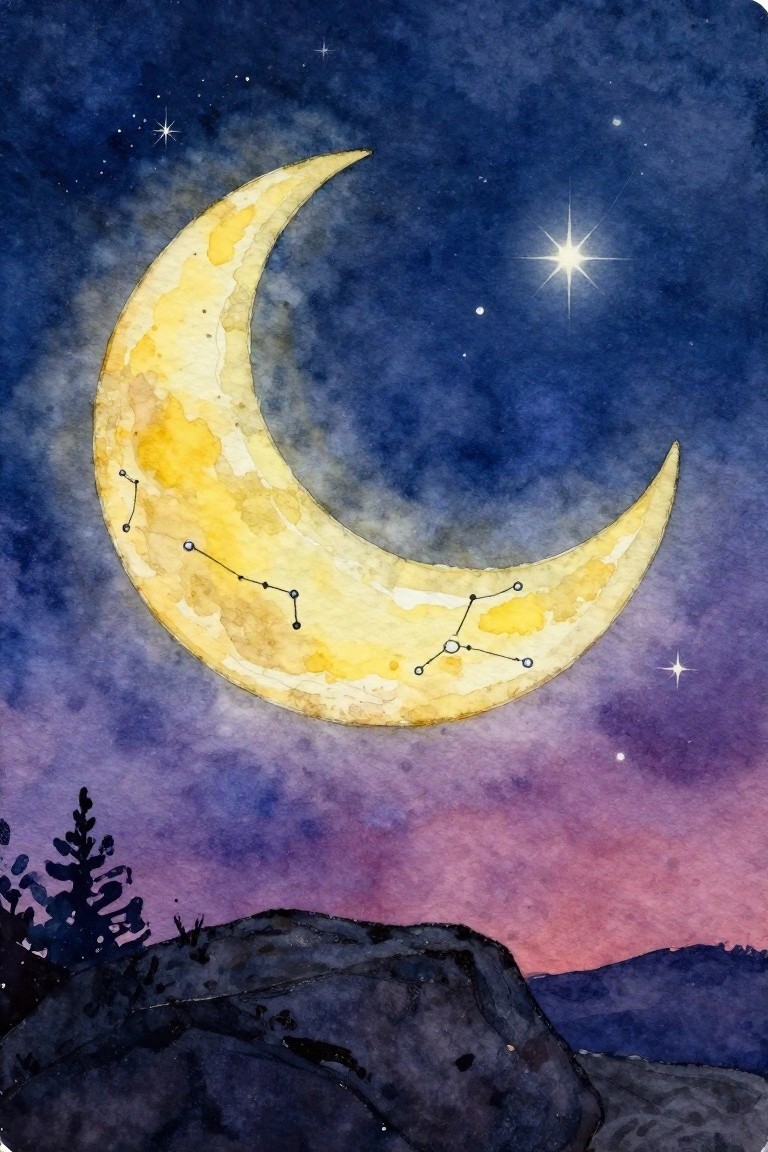
A large crescent moon in warm yellow tones serves as the main surface for a series of connected dots and lines that form simple constellation shapes. The idea places the star patterns directly on the moon rather than just in the surrounding sky, with a soft gradient background moving from deep blue at the top to pink near the bottom. Dark rocky shapes and tree silhouettes at the base create a grounded frame that keeps attention on the moon and its patterns.
What makes this idea useful is the built-in structure of the crescent shape, which gives beginners a clear area to fill without needing perfect symmetry. The constellation lines can be adjusted or simplified depending on the rock size, and the sky gradient works with just a few blended colors. This approach stands out for wall decor because the moon acts as both subject and pattern holder, making it easy to repeat with different star arrangements or color shifts for seasonal versions.
Cat Hatching from Egg Rock
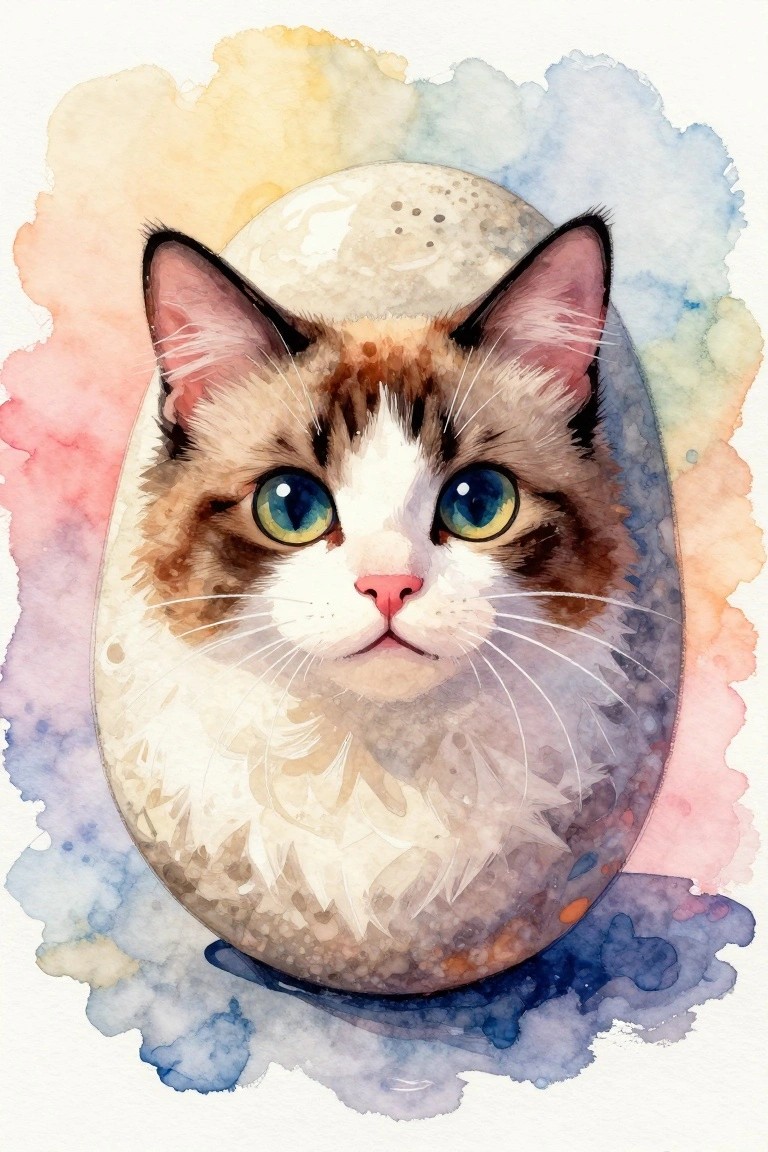
Paint an oval rock as a cat emerging from a cracked eggshell by centering the face and letting the stone’s shape form the egg body. Use blended brown and white tones for the fur while adding small speckles and soft lines to suggest shell texture around the edges. The oval format keeps the focus tight on the face without needing extra background elements.
What makes this idea useful is how the rock shape already supplies the egg outline so you only need to handle the face details. You can simplify the markings to basic patches or change the eye color to match a real pet. This version works well for gifts because the hatching theme feels complete on its own and photographs clearly for sharing.
Striped Sunset Rock
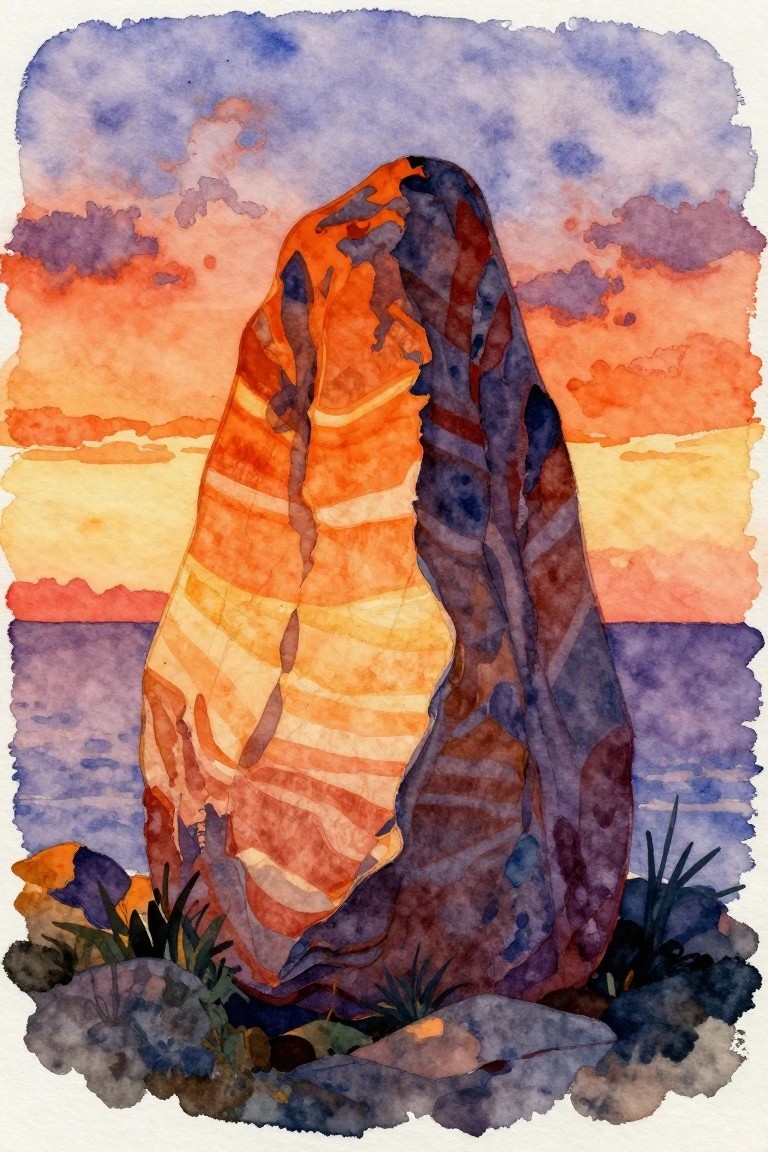
A rock painted with bold horizontal stripes in warm oranges and yellows on one side shifting into deep purples and blues on the other turns an ordinary stone into a sunset scene. The idea relies on color blocking rather than detailed shapes, letting the rock’s natural height and curves guide the stripe placement. This fits the decorative rock painting category where the goal is a quick outdoor or indoor accent using a simple gradient.
What makes this idea useful is that the stripes work on almost any tall or oval rock without needing perfect lines. You can change the color order to match a sunrise, a stormy sky, or even fall tones while keeping the same layout. For garden decor the painted rock stands out nicely when set among smaller stones and plants. The same striped approach can be scaled down to river rocks for paperweights or gifts.
Sunflower Centered Among Speckled Stones
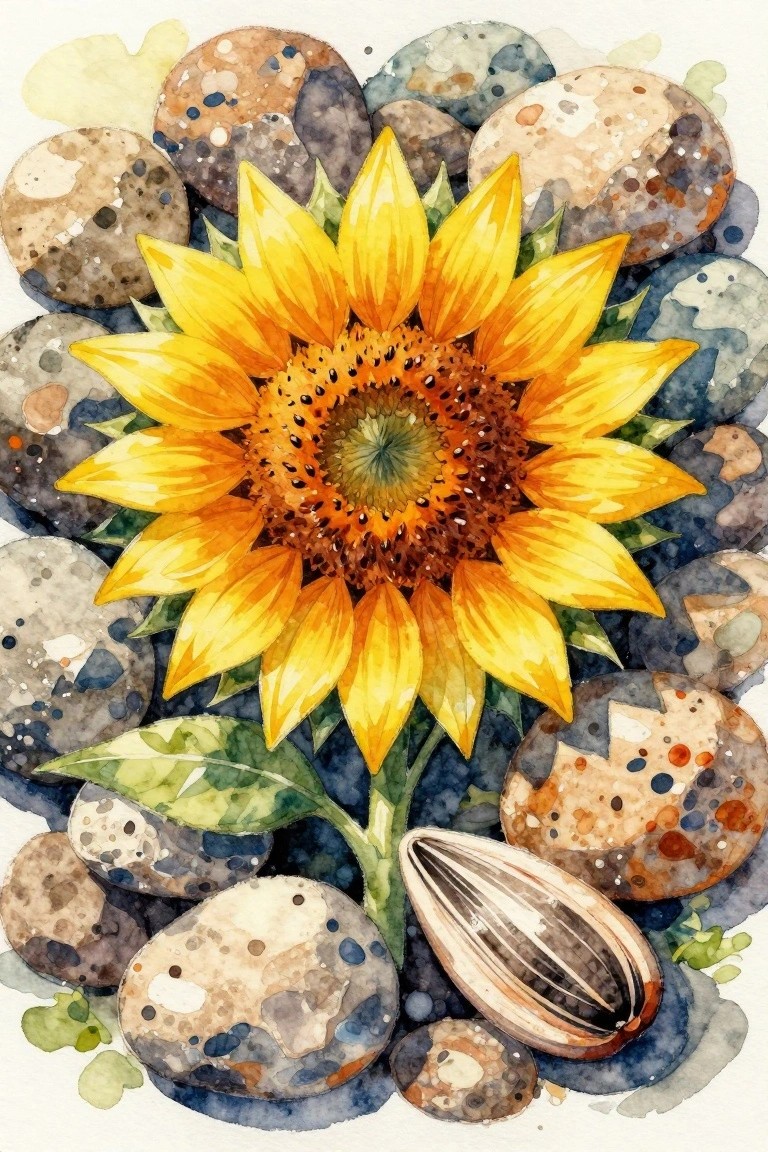
A sunflower painted in bold yellows and oranges sits at the center of a loose cluster of stones. The rocks are treated with soft speckled patterns in muted browns, grays, and blues that let the flower remain the clear focal point. Placing a single sunflower seed near the bottom edge adds a simple finishing detail that connects the elements without crowding the space.
What makes this idea useful is how the stones act as a ready-made border that requires only light texture work. The color contrast between the bright petals and the darker rocks keeps the design readable even if you scale it down or paint it on a single large stone. This layout works especially well for garden-themed pieces or quick gifts since the main shapes stay simple while the speckling adds interest.
Winking Smiley Emoji Rock

A winking smiley face works well as a rock painting idea because it relies on basic circular shapes and a limited color range. The main face stays a solid yellow with a darker brown tone added to one eye for contrast, while the open grin and single wink stay bold and easy to read from a distance. This keeps the focus on the emoji itself rather than extra details or shading.
What makes this idea useful is how quickly the same emoji can be adjusted to fit rocks of different sizes. You can paint just the face on a smooth round stone or add a simple splatter background if you want more color around the edges. The design also adapts easily if you swap the wink for a different expression or change the yellow to another bright base color. For practice, this kind of subject helps you work on clean edges and even coverage without needing fine detail work.
Frequently Asked Questions
What supplies do beginners need to get started with rock painting? Acrylic paints, a set of small brushes, and a clear sealer are the main items required. Smooth river rocks or stones from craft stores work well as your base. Gather some paper towels, water cups, and optional paint pens for fine details to keep the process simple and mess free.
How should rocks be prepared before applying any paint? Wash each rock thoroughly with mild soap and water to remove dirt or oils. Allow them to dry completely for several hours or overnight. A light coat of white primer can help colors show up more vividly on dark stones.
What is the best way to seal painted rocks for outdoor use? Let the paint dry fully for at least 24 hours. Apply two thin layers of outdoor rated clear acrylic sealer, allowing each layer to dry between coats. This creates a protective barrier against rain and fading while keeping the colors bright.
How can painted rocks be used as home or garden decor? Place them along garden paths as markers, arrange them in a decorative bowl on a table, or tuck them into potted plants for a pop of color. They also make thoughtful handmade gifts when personalized with names or simple patterns.
Are there any tips to make rock painting easier for children or first timers? Choose larger rocks with flat surfaces and start with basic shapes like dots, stripes, or hearts rather than detailed scenes. Work in short sessions and keep a damp cloth nearby for quick fixes. Display finished pieces indoors first to build confidence before moving to outdoor projects.