
I’ve been painting with acrylics for a few years.
I remember how tricky it felt at the start.
Certain techniques made a noticeable difference in my results.
Here are 21 of them that work well for beginners like I was.
They keep things simple and practical.
Layered Overlapping Circles
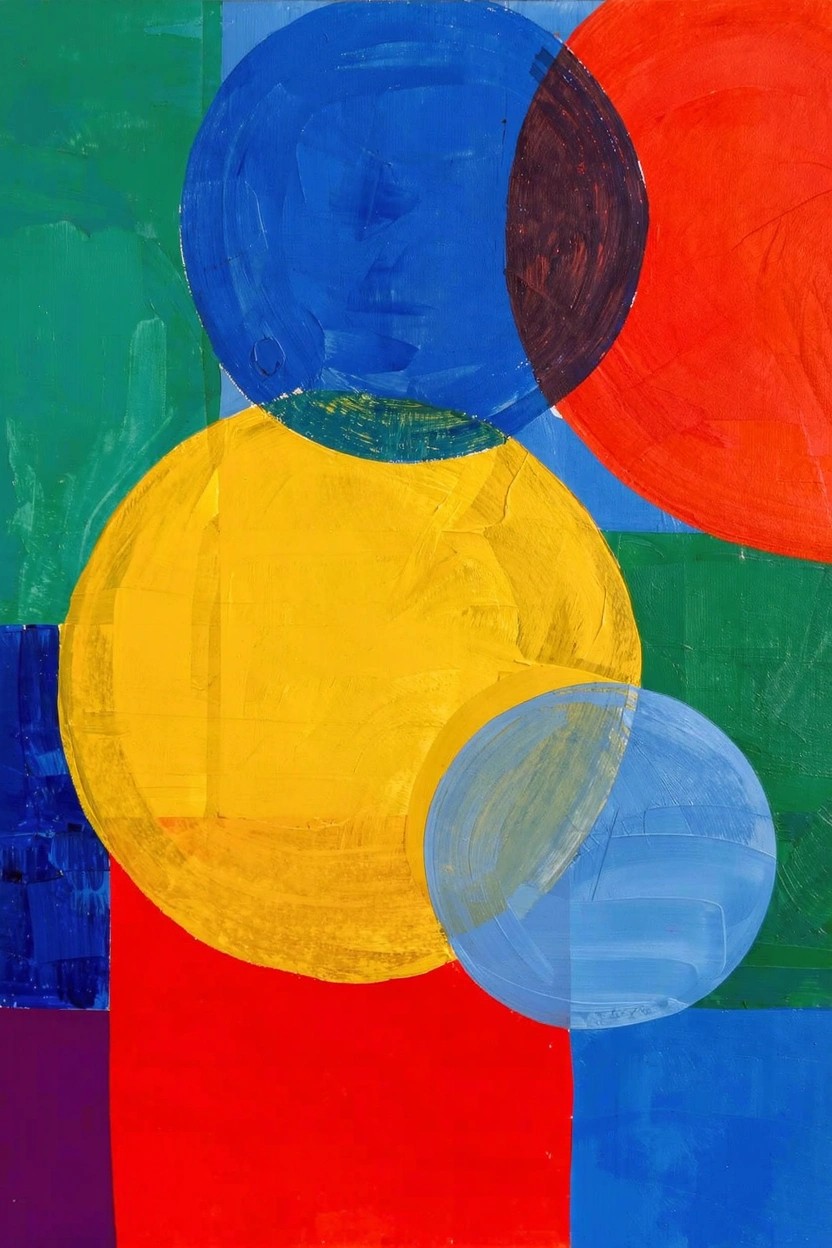
Stacking semi-transparent circles in bold primaries like blue, yellow, and red builds depth through color overlaps that mix on the canvas. Solid color blocks in green and purple ground the floating shapes, while varying sizes create movement without needing fine details. This abstract geometric approach shines in decorative wall art for its clean yet lively composition.
What makes this idea useful is the fast-drying acrylic layers that let you stack colors cleanly for instant dimension. Beginners can outline circles freehand or with tape for sharp edges, then adapt the palette to seasonal themes or room accents. It turns into quick canvas decor that pops on Pinterest thanks to the high-contrast vibrancy.
Layered Warm-Tone Floral Cluster
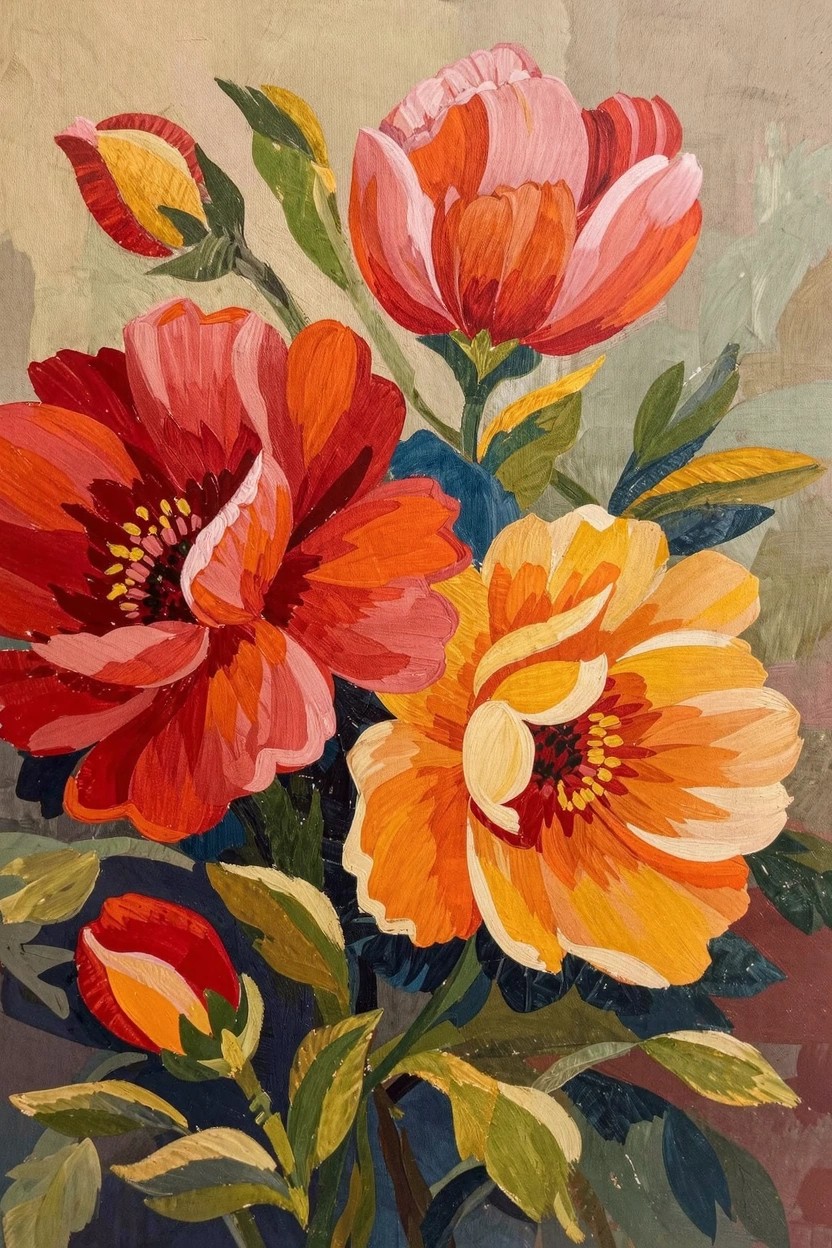
Build depth in a floral still life by layering broad, rounded petals in a gradient from deep reds and pinks through oranges to sunny yellows, with supporting green leaves and buds adding asymmetry. This composition pops through strong color contrasts and overlapping shapes against a neutral background, fitting decorative floral wall art. The varied petal edges and centers keep the focus tight without heavy detailing.
The bold color flow makes this approachable for acrylics since wet blending handles the transitions easily on a dry background. Scale it down for cards or up for canvas decor, and swap hues to match any room—think blues for a cooler twist. For practice, the cluster layout builds confidence in shape blocking before refining layers, and its energy grabs attention on Pinterest feeds.
Layered Color Bands for Sunset Landscapes
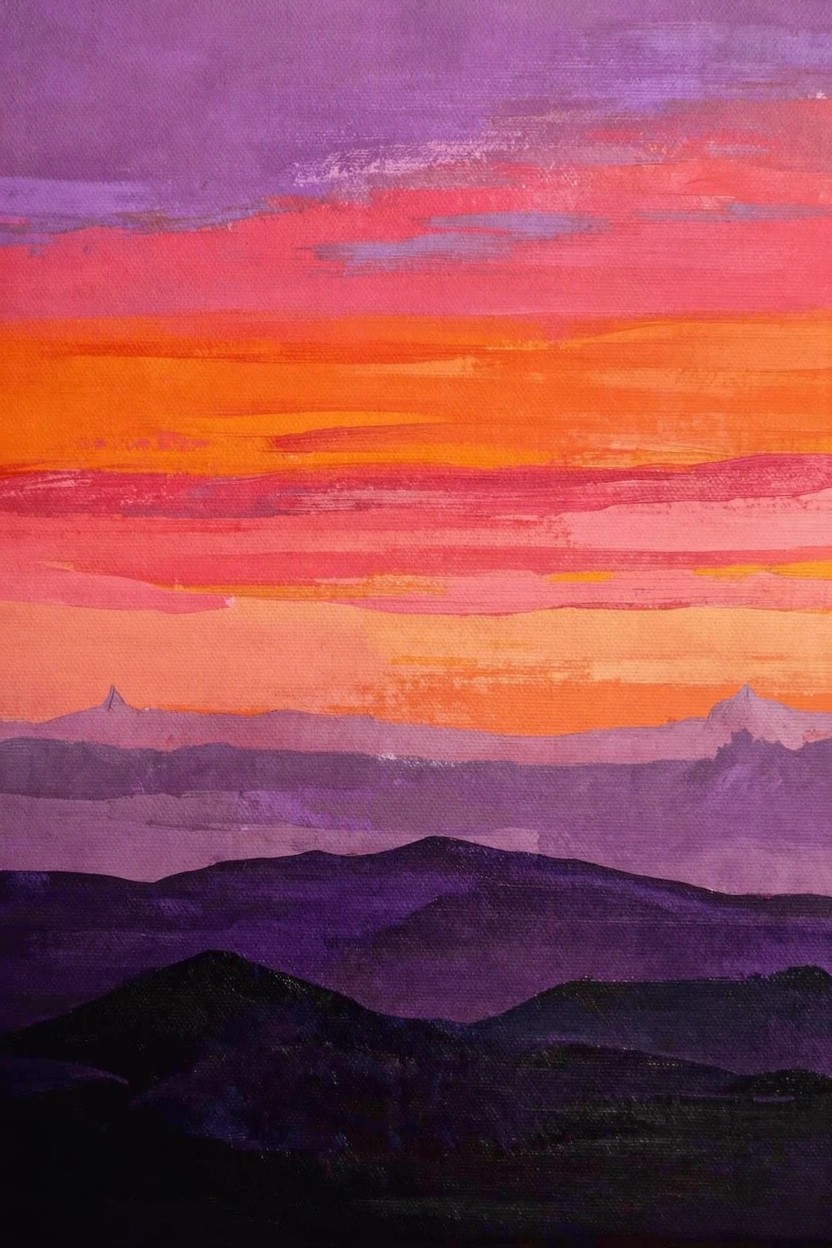
Layer broad horizontal bands of purple, pink, orange, and red to build a sunset sky over silhouetted mountains. The smooth gradients from cool upper tones to warm horizon colors create depth and movement through simple overlaps. This landscape technique shines in acrylics because the quick-dry layers let you blend wet-on-wet for soft transitions while keeping mountain edges crisp.
The bold color stacking makes this straightforward to layer up without needing precise drawing skills. Practice blending mid-tones first, then darken foreground mountains for instant dimension. Swap hues for dawn or twilight versions, or scale it small for cards—the vibrant palette grabs attention as wall art or Pinterest thumbnails.
Vibrant Stacked Lids Still Life
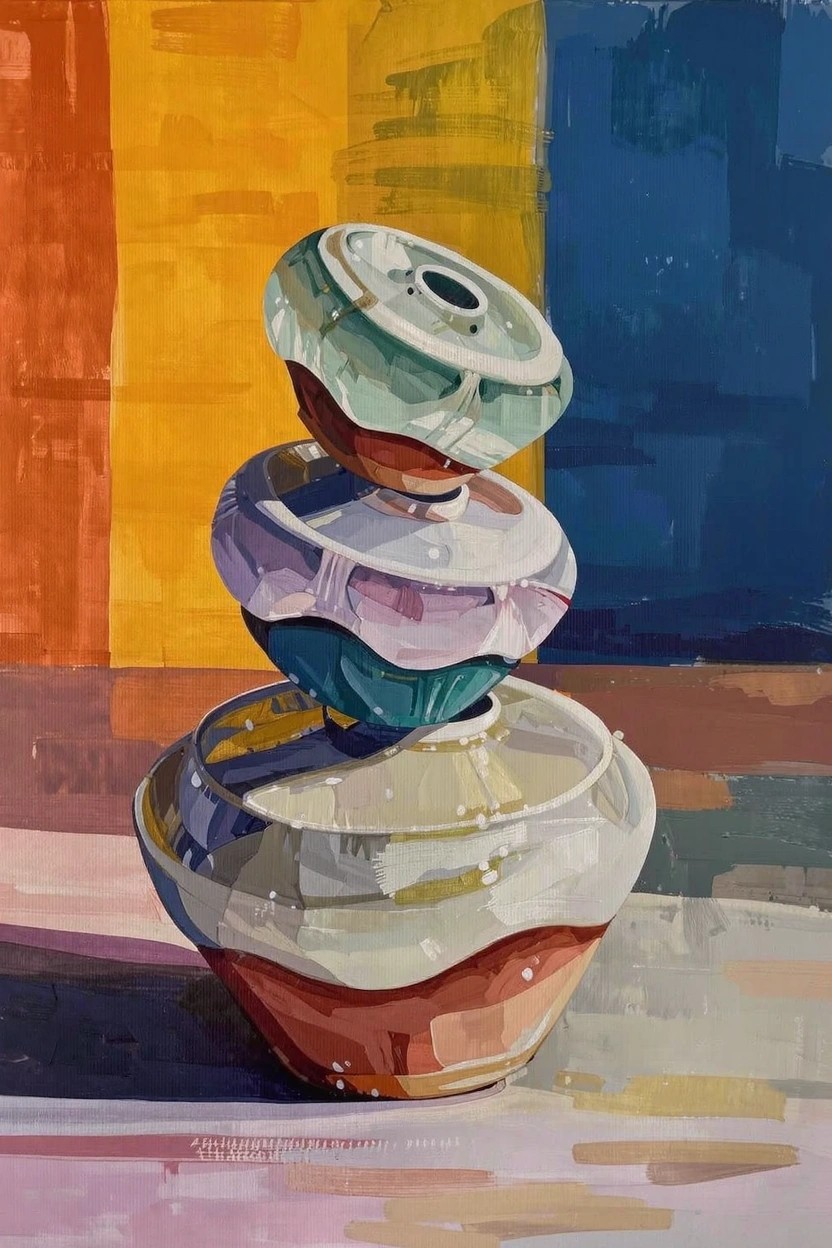
Stacking glossy lids in greens, purples, reds, and whites atop a terracotta vase builds a lively still life that emphasizes shape and color over realism. The translucent edges let lower layers show through for built-in depth, while the upright composition draws the eye upward against bold background color blocks. This decorative setup fits acrylics well with its loose brushwork and high contrast.
The simple stacked forms make this easy to block in with flat shapes before adding loose edges and color overlaps. Switch the lid colors to match your kitchen for a personalized touch, or scale it down for coasters. On Pinterest, the punchy palette and everyday objects grab attention as quick wall art ideas.
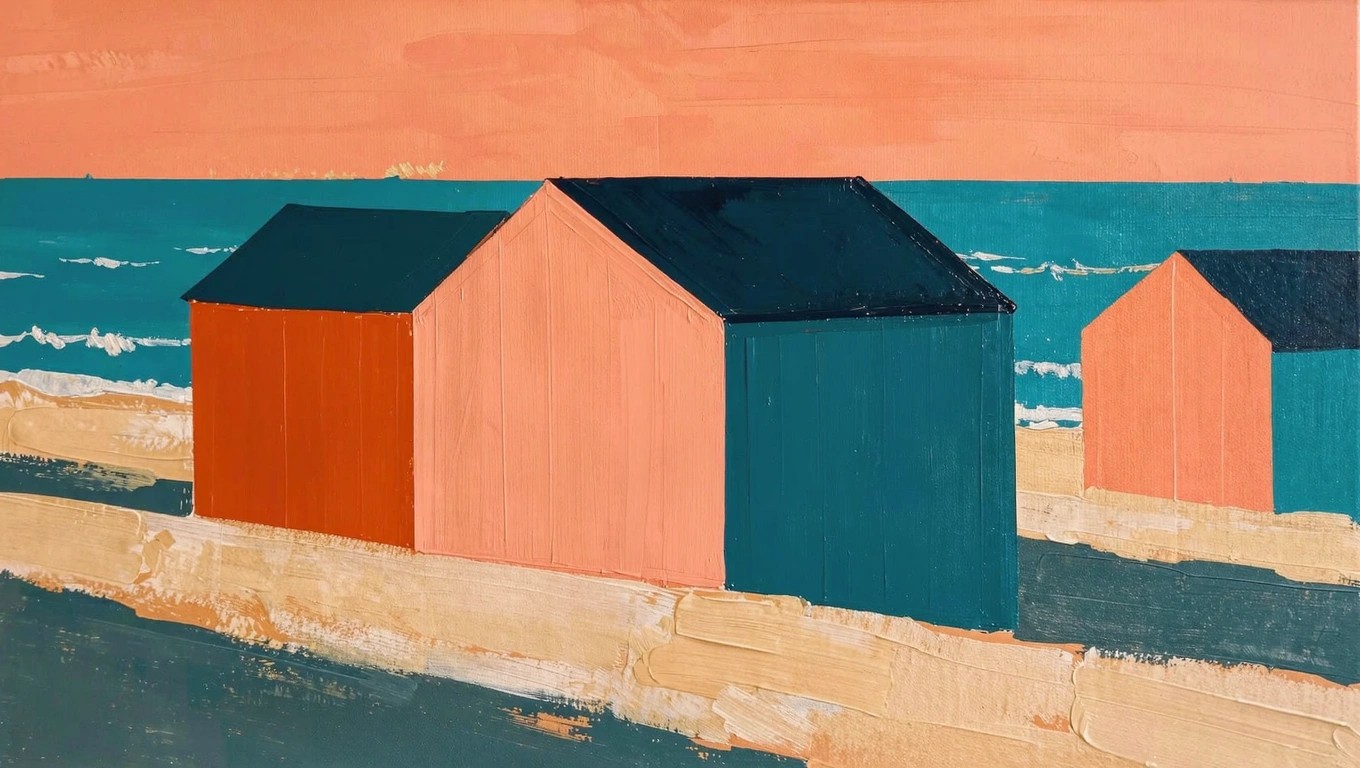
Textured Weathered Fence Posts
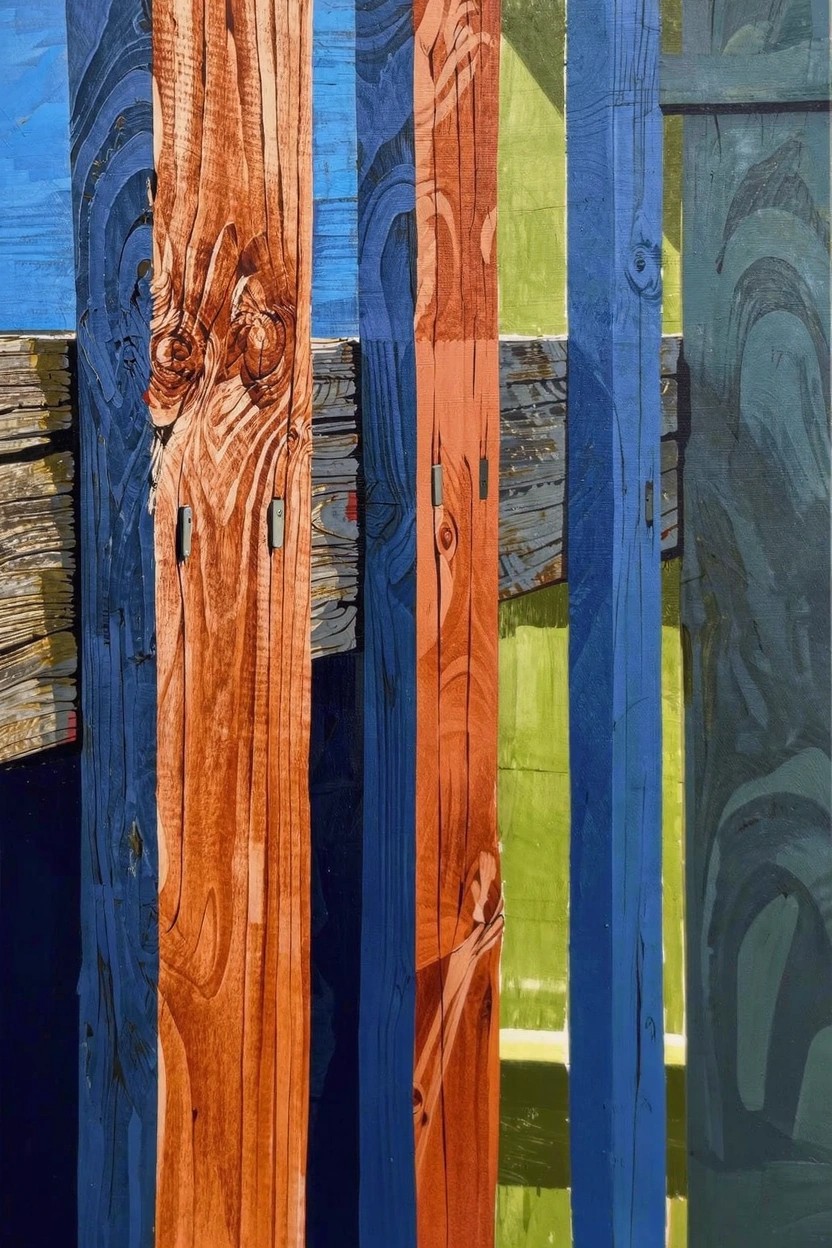
Vertical wooden posts in bold blues and rusty oranges form a simple yet dynamic composition that highlights peeling paint layers and wood grain texture. Contrasting colors between posts draw the eye upward, while the green backdrop peeking through adds subtle depth without overwhelming the focus. This textured abstract idea slots into wall art or decorative pieces that mimic outdoor patina.
The vertical lines make blocking in shapes straightforward on stretched canvas or wood panels, letting beginners focus on texture practice with dry brush or impasto. Bold hues cover imperfections fast, and you can adapt by toning down layers for a cleaner look or swapping colors for urban murals. For Pinterest, the rustic-modern contrast pulls strong views in home decor boards.
Textured Multi-Color Peony Bouquet
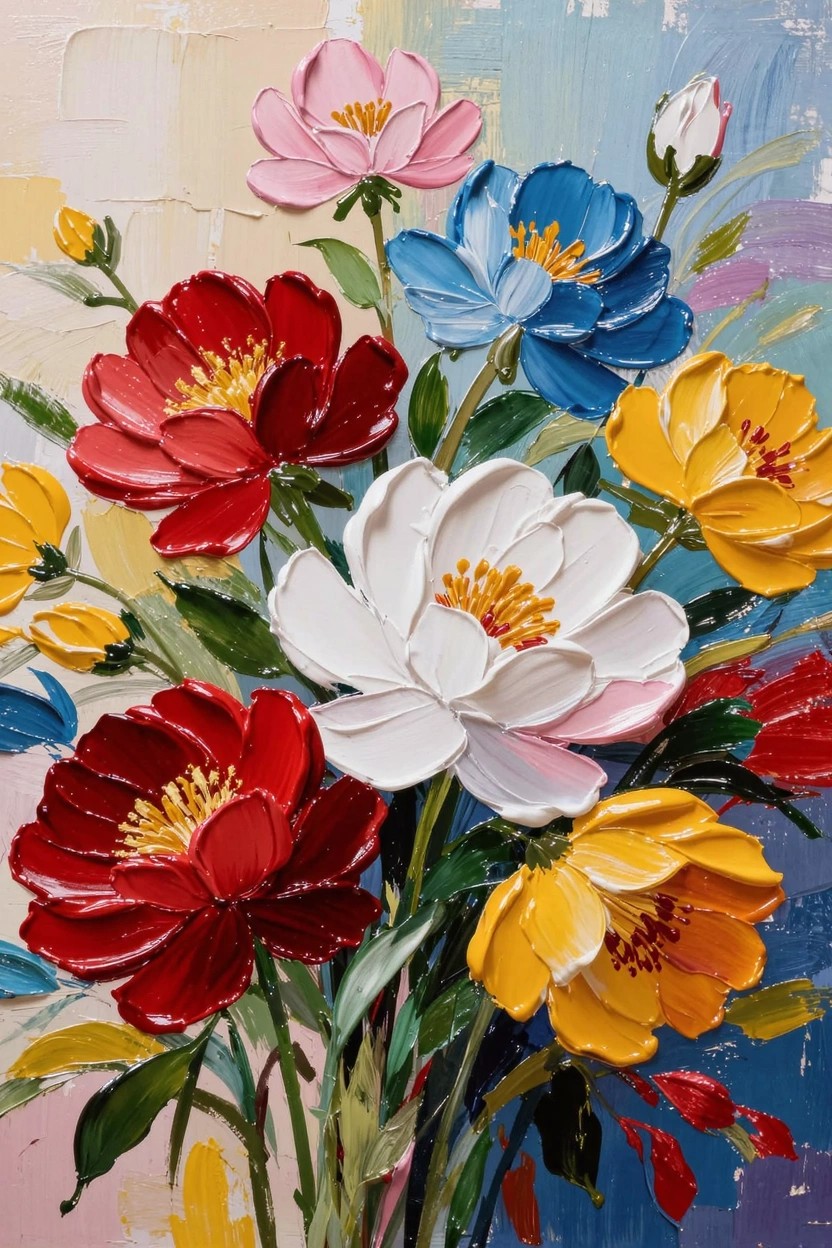
Loose clusters of peonies in reds, pinks, yellows, whites, and blues pack a canvas with overlapping shapes built up through thick impasto strokes that add instant dimension. The composition gains punch from high contrast between saturated flower centers and softer blended background hues, keeping energy high without tight edges. This textured floral still life shines as decorative wall art that plays to acrylic’s fast-drying strengths.
Thick layering forgives wonky petal shapes since the texture carries the visual weight. Beginners can scale it down to fewer flowers or swap colors for seasonal tweaks like autumn oranges. On Pinterest, the dimensional pop makes it a standout for canvas decor that looks pro without hours of detail work.
Layered Sunset Clouds

Layering cool blue and purple clouds against vibrant orange and red sunset tones builds a glowing atmospheric depth in landscape paintings. The soft edges and color gradients from dark to light create natural illumination without intricate detailing. This sky-focused idea slots into landscape or seasonal acrylic categories, relying on bold contrasts for visual punch.
The bold color shifts make blending accessible even for beginners, as acrylics dry fast to layer warm glows over cool bases. Scale it down for cards or up for wall art, and tweak hues for dawn or dusk variations. Its vibrant energy pops on Pinterest as quick canvas decor.
Layered Textured Palm Trunk Silhouette
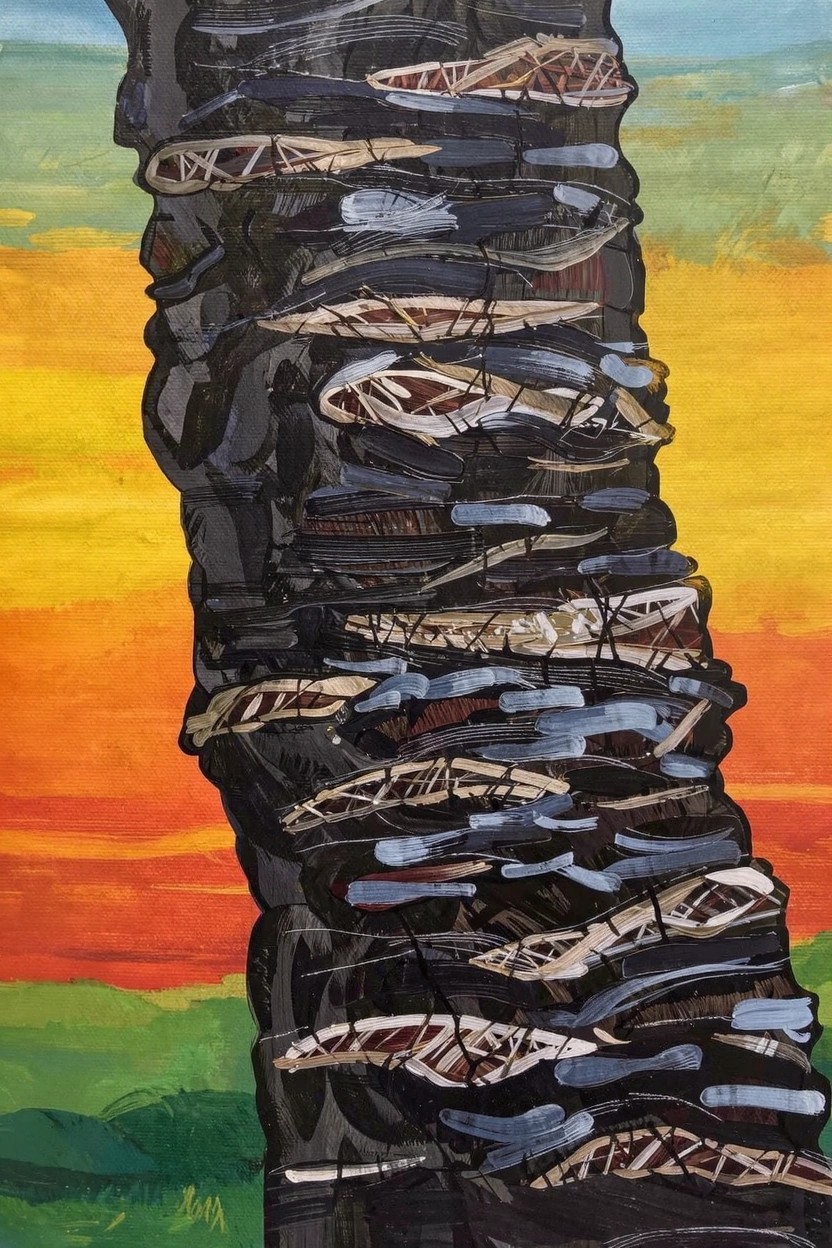
Stack irregular dark bark-like segments vertically to form a slim palm trunk that anchors the canvas, using thick acrylic layers and rough scraping for natural texture. Build the trunk with overlapping grays, blacks, and subtle blues to suggest weathered wood, then contrast it against a bold sunset gradient of oranges, yellows, reds, greens, and sky blues. This vertical composition draws the eye upward, turning a simple tree shape into dynamic wall art through shape stacking and edge variation.
The bold trunk-to-background contrast does most of the visual work, letting you focus on texture without perfect realism. For practice, start with a wet-blended gradient base, then add trunk layers that dry fast in acrylics. This adapts easily to smaller canvases or personalized color shifts, making it a standout for Pinterest landscapes or quick seasonal pieces.
Pine Tree Silhouette at Sunset
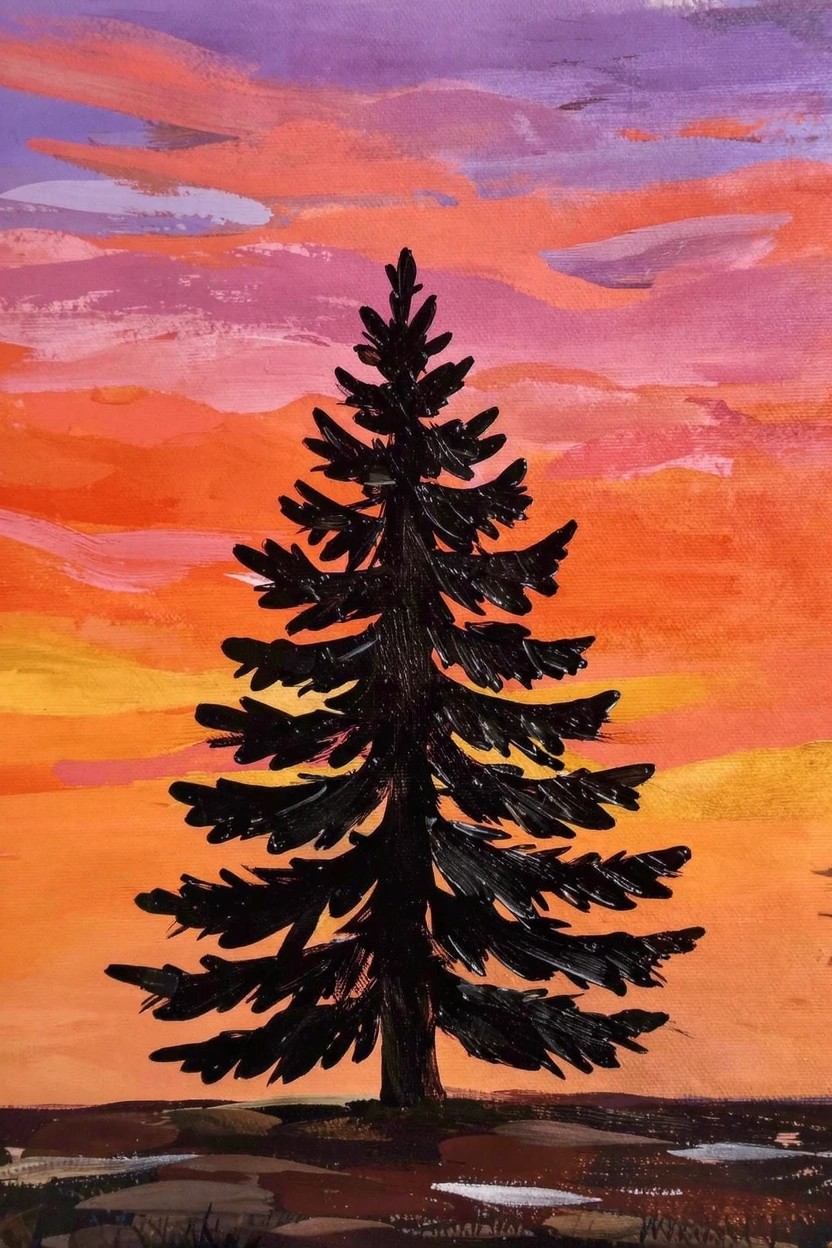
Paint a tall pine tree as a solid black silhouette against a blended sunset sky to capture evening drama with minimal foreground detail. Layer wet acrylics in oranges, pinks, and purples for a smooth gradient that transitions from horizon to upper sky, letting the tree’s sharp branches stand out through high contrast alone. This landscape idea shines in the seasonal category, where simple shapes amplify colorful backdrops.
The bold contrast handles most of the visual impact, making it ideal for practicing wet-on-wet blending without stressing over tree textures or leaves. Swap the pine for other evergreens or adjust sky tones for different times of day to personalize it for wall art or seasonal canvases. For beginners, the silhouette format cuts down on detailing time while still yielding Pinterest-ready results.
Grayscale Seascape with Red Shell Focus
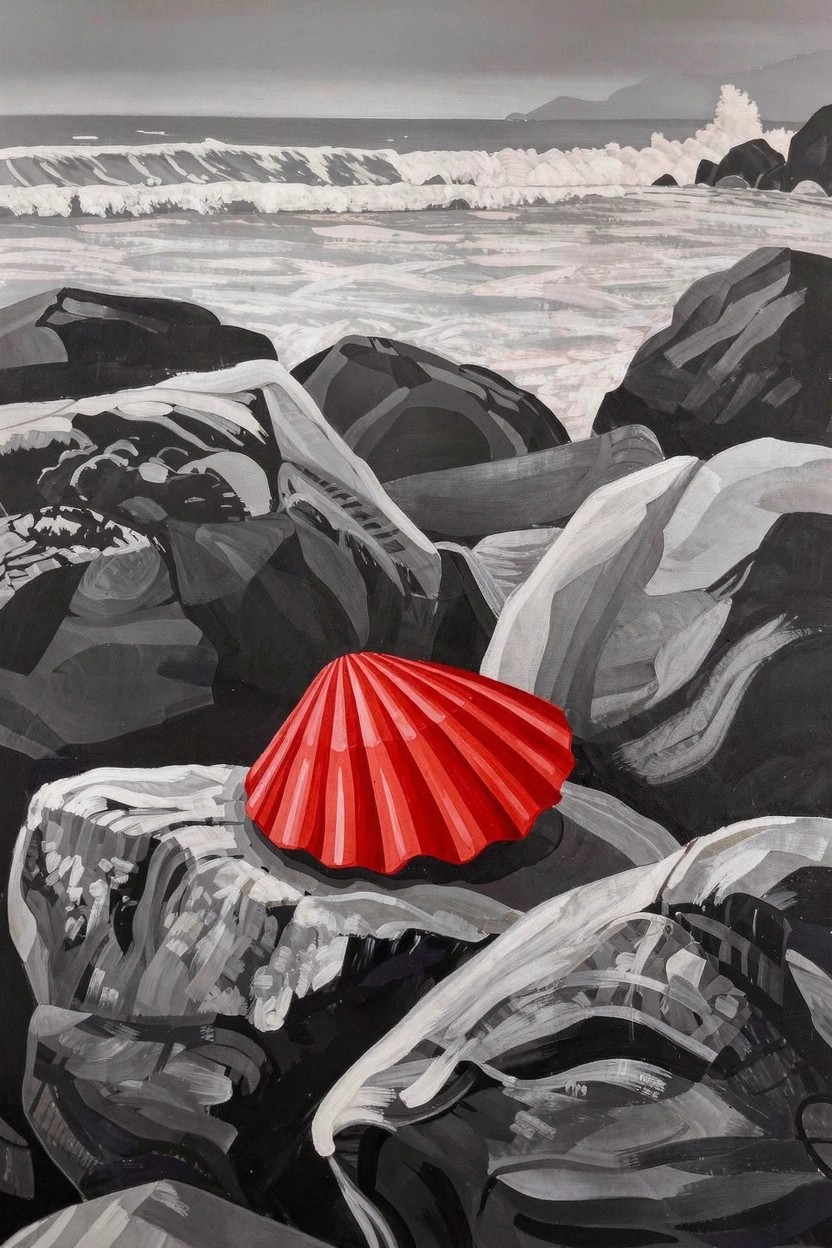
Paint a detailed grayscale seascape of ocean rocks, waves, and distant shorelines, then add a single bright red scallop shell as the focal point to draw the eye instantly. This still life landscape idea relies on extreme color contrast for visual punch, where the monochromatic background lets the shell’s bold shape and hue dominate without competing elements. Flat shapes and sharp edges keep the composition clean and effective for acrylic layering on canvas.
The bold contrast carries the painting, making it forgiving for beginners since the grayscale base builds easily with dry brushing and the shell pops with just a few wet layers. Adapt it by swapping the shell color for seasonal accents like orange pumpkins or blue ornaments, or simplify the rocks for quicker practice sessions. This setup stands out on Pinterest as versatile wall art that looks pro with minimal detail.
Layered Coastal Cliffs Seascape
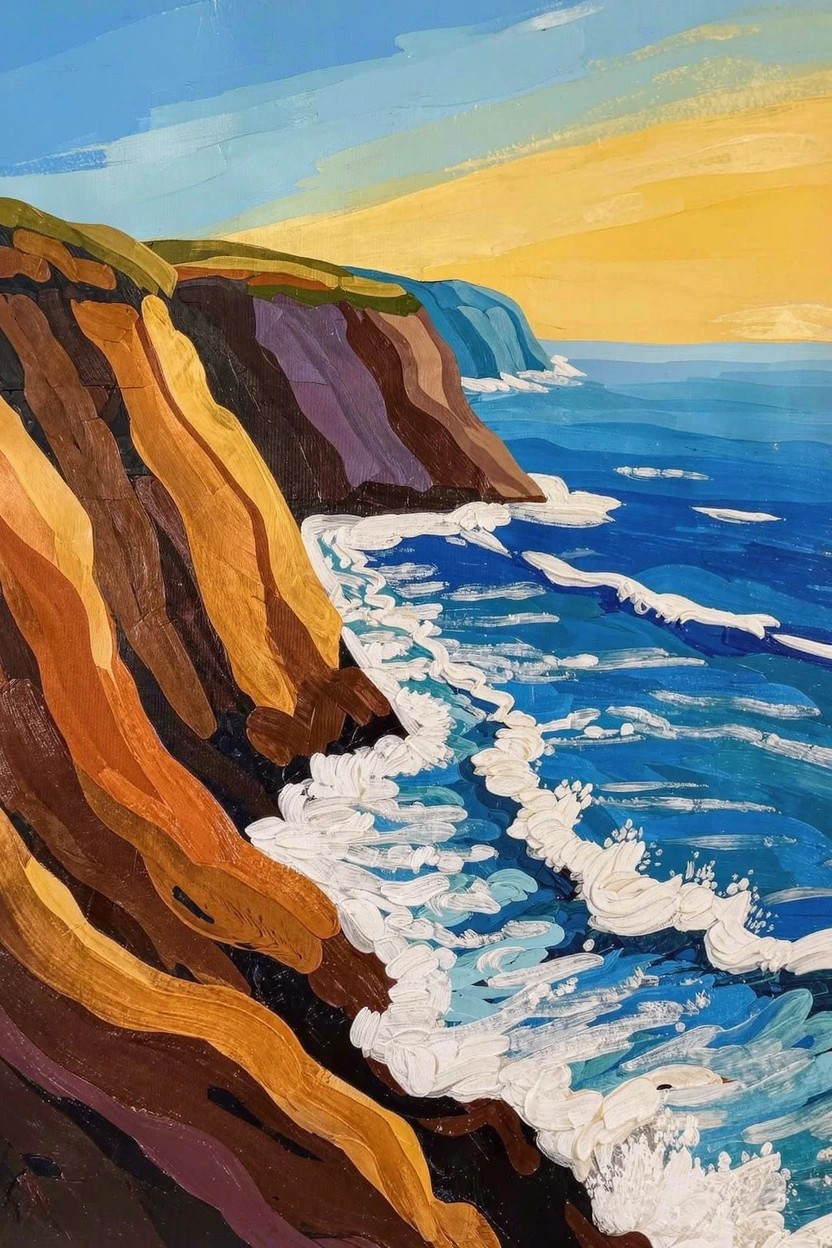
Layered coastal cliffs dropping straight to crashing ocean waves make a strong acrylic landscape idea, using stacked bands of warm ochres, umbers, and purples to mimic stratified rock faces. The composition pulls focus with a sharp vertical drop from land to sea, where broad blue strokes and white foam suggest motion without fine detail. This fits the landscape category, relying on acrylic’s fast layers to build depth in rugged terrain.
What makes this idea useful is how the bold color blocking creates instant drama and depth, perfect for practicing wet-on-dry blending on a large canvas. Beginners can simplify by reducing cliff layers to three or four hues, or swap sunset warms for cooler dusk tones to personalize. It stands out as vibrant wall art on Pinterest, especially scaled up for gallery wraps.
Bold Striped Leaves in Jungle Contrast
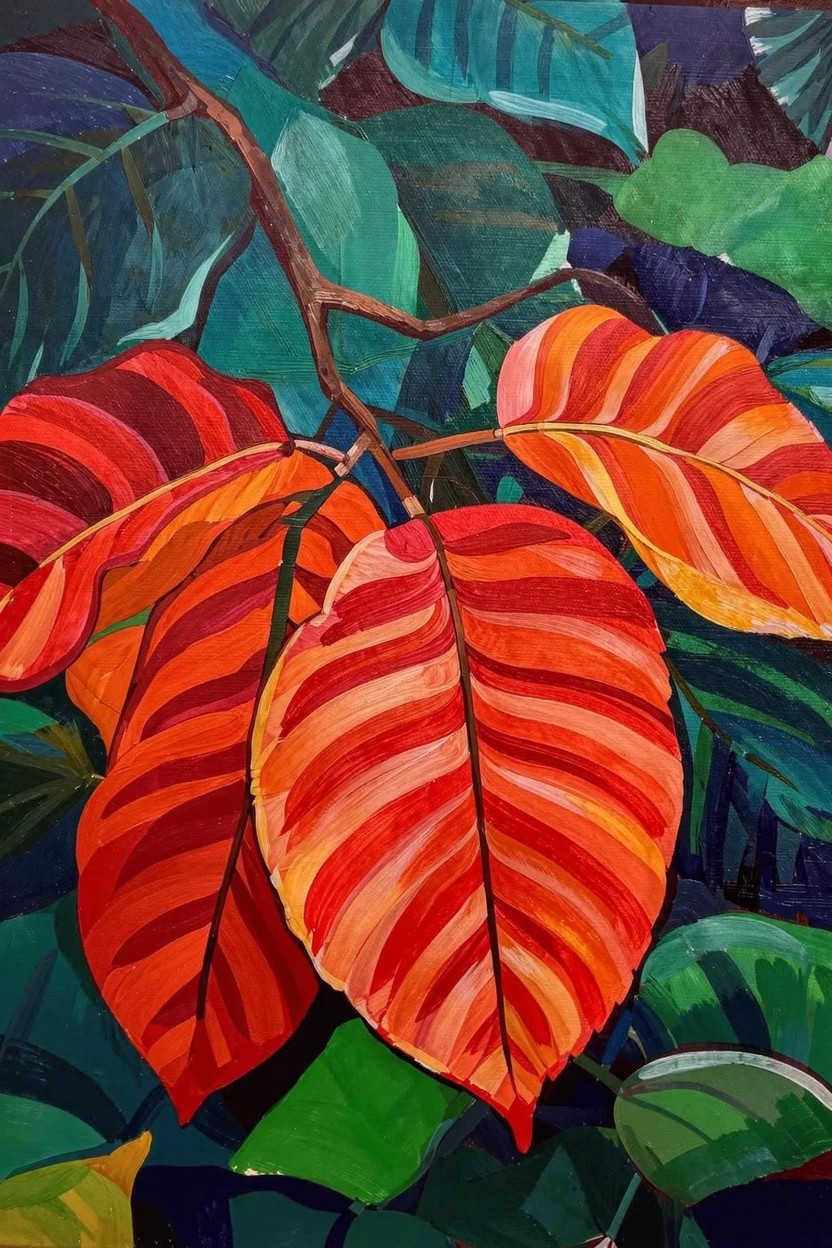
Layer veined red-orange leaves over deep green foliage branches to build a compact still life that pops with color blocking. The composition stacks three main leaves forward, using their natural striping for built-in texture and shape rhythm against a dark backdrop. This decorative acrylic idea fits seasonal or tropical wall art through its high-contrast layering.
The bold contrast between warm leaves and cool greens carries the visual impact, making it forgiving for uneven edges or simple brushwork. Beginners can practice wet-on-dry blending for the veins or swap colors for different seasons without losing punch. Scale it down for cards or up for canvas decor, and the graphic style grabs attention on Pinterest feeds.
Layered Colorful Rolling Hills

Layering broad acrylic strokes in blues, greens, yellows, and oranges builds undulating hills that suggest depth in an abstract landscape. Cool background tones fade into warm foreground colors, with visible brush marks creating rhythmic flow across the canvas. This approach shines in abstract landscapes by relying on color stacking and shape for impact over precise outlines.
Broad color layers make this idea beginner-friendly since wet paint blends easily without needing sharp edges or tiny details. Swap hues to match seasons, like deeper reds for fall, or simplify to three colors for quicker practice. Vibrant contrasts ensure it pops as canvas wall art or Pinterest inspiration for bold, modern decor.
Layered Red Poppy Clusters
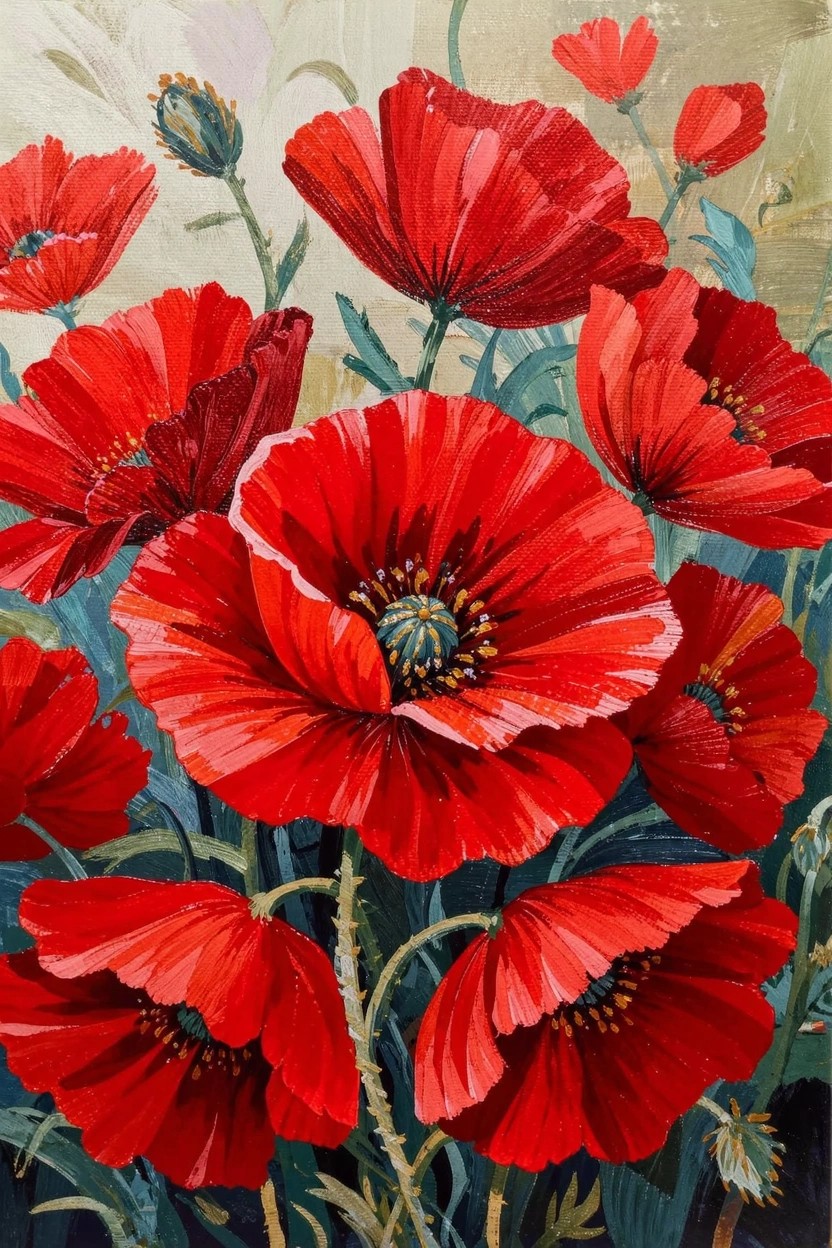
Build a vibrant floral display by clustering overlapping red poppies with green stems and buds for natural depth and movement. The composition works through bold crimson petals edged sharply against softer beige tones, creating focus on the flowers’ layered forms. This idea slots into decorative floral wall art, where petal buildup adds dimension without complex backgrounds.
The bold red saturation carries the painting, letting beginners layer wet-on-wet for petal glow while keeping stems loose. It adapts easily to smaller canvases or color swaps like orange for autumn vibes, and stands out on Pinterest for its punchy, gallery-ready look. Practice edging petals sharpens control over acrylic flow.
Abstract Dripping Hill Landscape
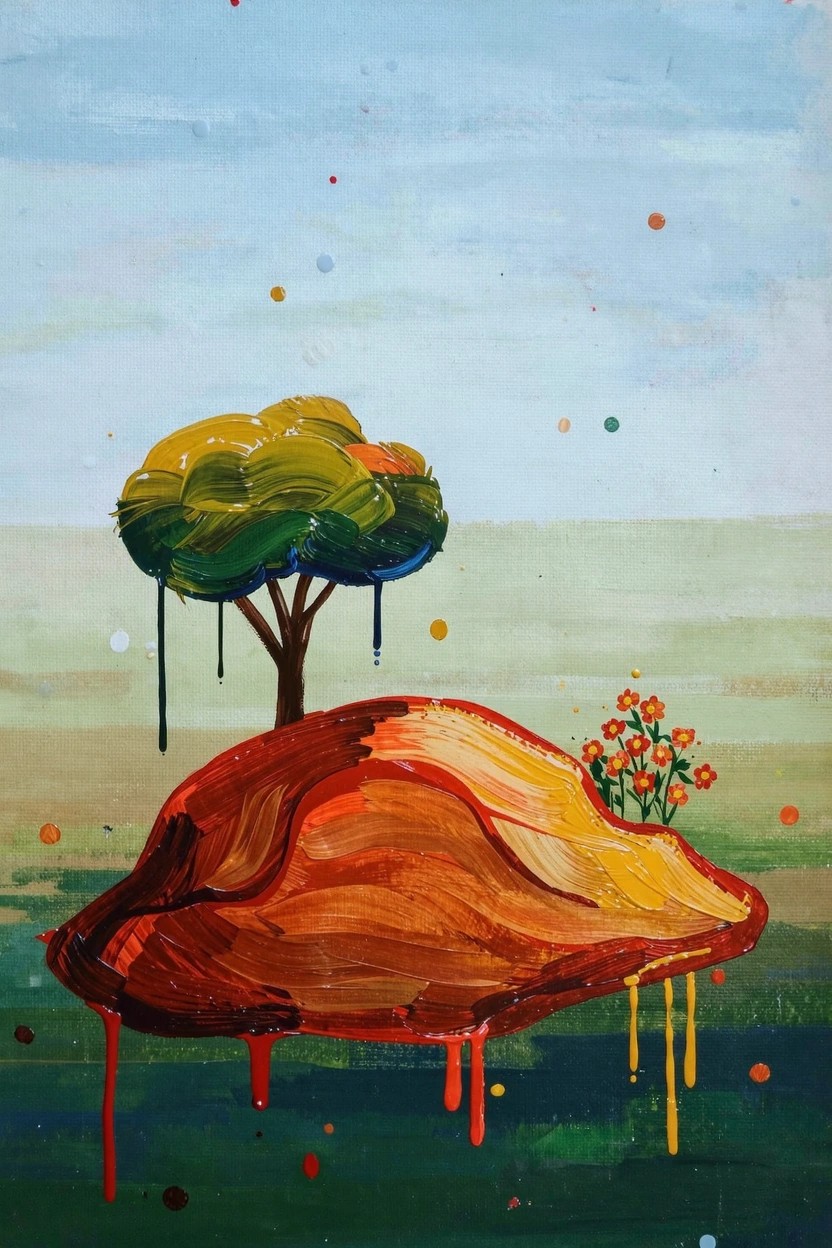
Paint a surreal landscape with a central bulbous hill in layered oranges and yellows that drip realistically downward, topped by a loose green tree with subtle drips from its branches. Small clustered flowers add a pop on one side, while scattered dots and a hazy blue-green sky keep the focus on the organic shapes. This abstract approach uses bold color contrasts and fluid drips to build visual energy through simple forms.
The drip technique builds texture and movement without needing precise lines, making it approachable for practicing wet paint control on a canvas. Scale down the drips or swap hill colors for seasonal twists like cool blues in winter versions. Its vibrant, graphic style stands out as quick wall art or Pinterest shares that grab attention fast.
Bold Patchwork Vase Still Life
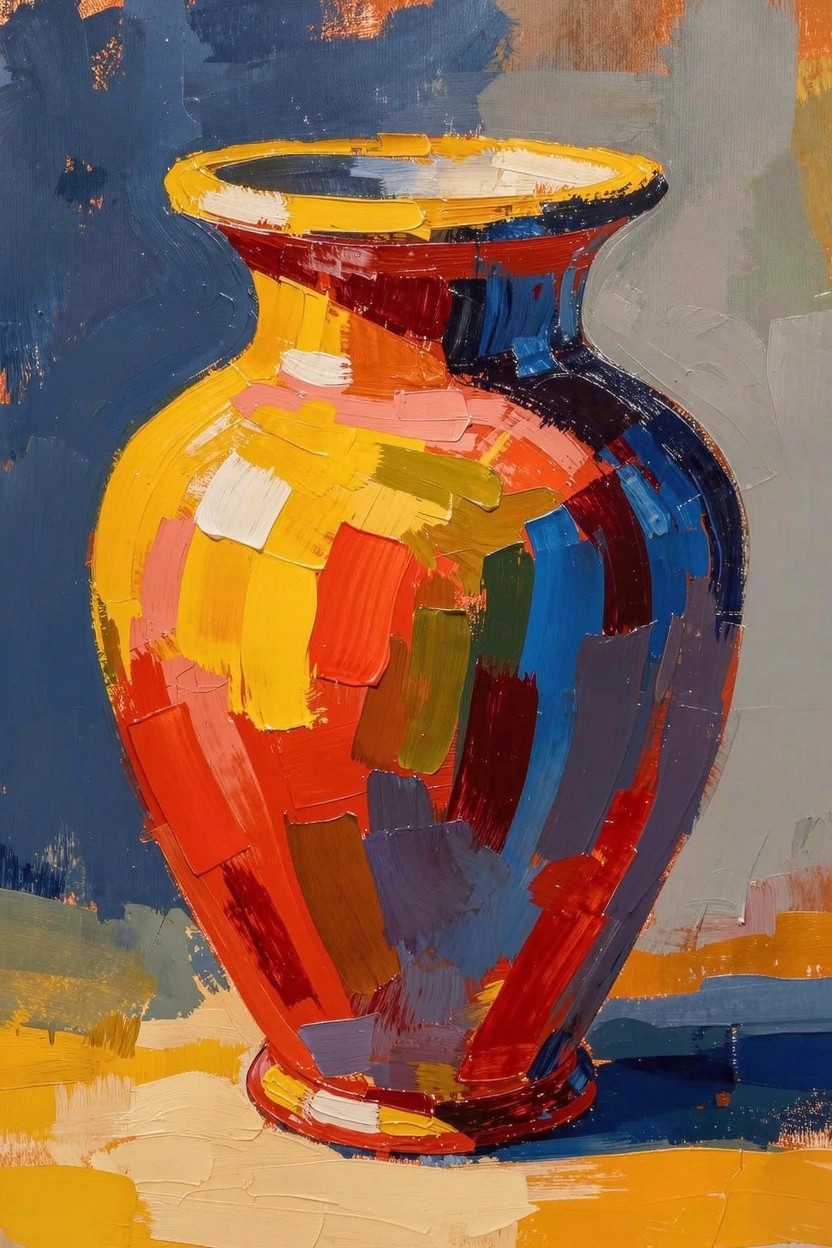
Layering thick acrylic strokes in clashing colors builds a vase that pops through its patchwork surface and sharp edges against a soft background. This still life idea uses loose, visible brushwork to suggest form without fine detail, letting color blocks define the curves and height. The result draws the eye with high contrast and texture you can feel in the paint.
What makes this idea useful is how the chunky strokes forgive blending mistakes and build depth fast on a small canvas. Beginners can swap the color blocks for their own palette or simplify to fewer shades for quicker results. It adapts easily to wall art or gifts since the bold style stands out in photos and prints without needing perfection.
Vibrant Abstract Face Portrait
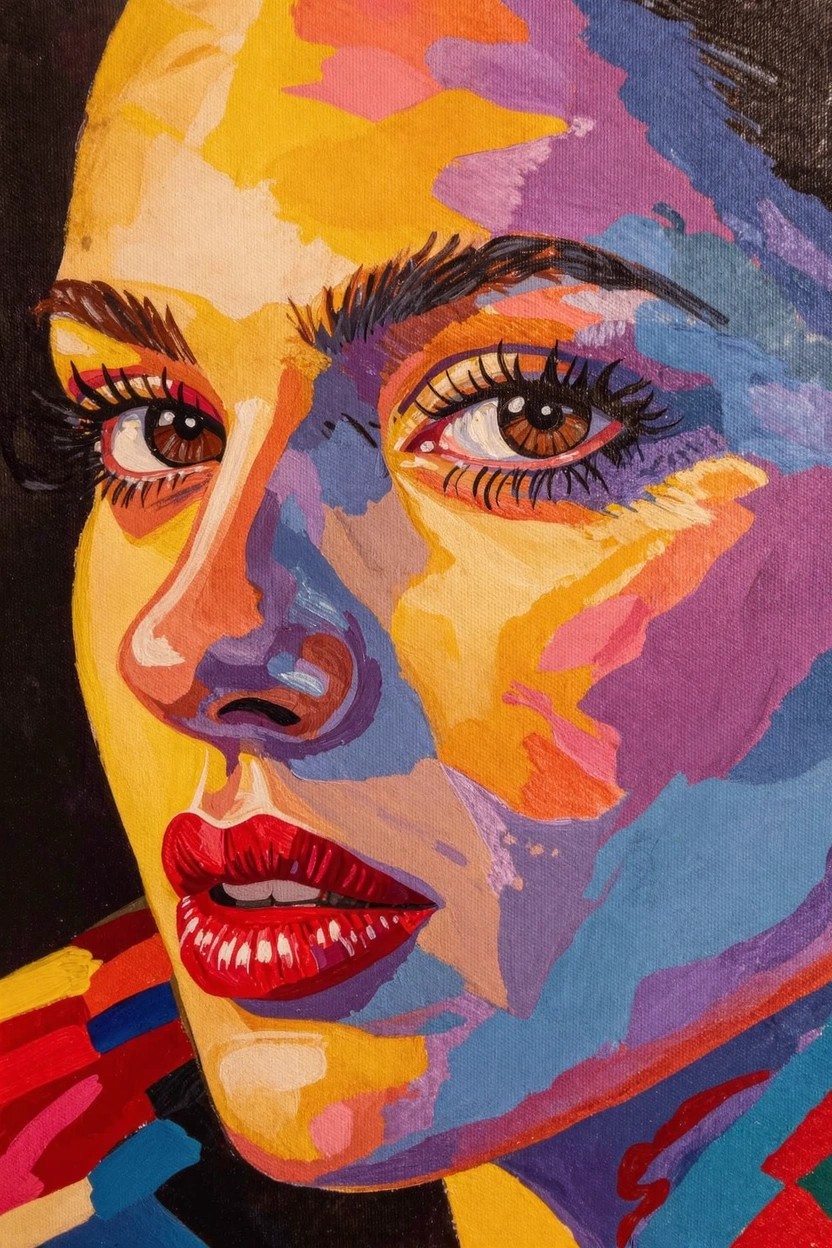
Layer bold blocks of yellow, purple, and blue to build a woman’s face in abstract style, where overlapping colors define features like eyes, nose, and lips through contrast rather than outlines. The composition gains impact from sharp color edges against smoother blends, creating depth and focus without realistic shading. This approach suits abstract portraits aimed at bold wall art.
What makes this idea useful is the way color blocking breaks down the face into simple shapes that beginners can layer progressively for better control. Swap the warm-cool palette for monochromatic tones or add personal tweaks to the features for quick adaptations. It shines as canvas decor or Pinterest share due to the high-contrast pop that grabs attention fast.
Vibrant Geometric Abstract Portrait
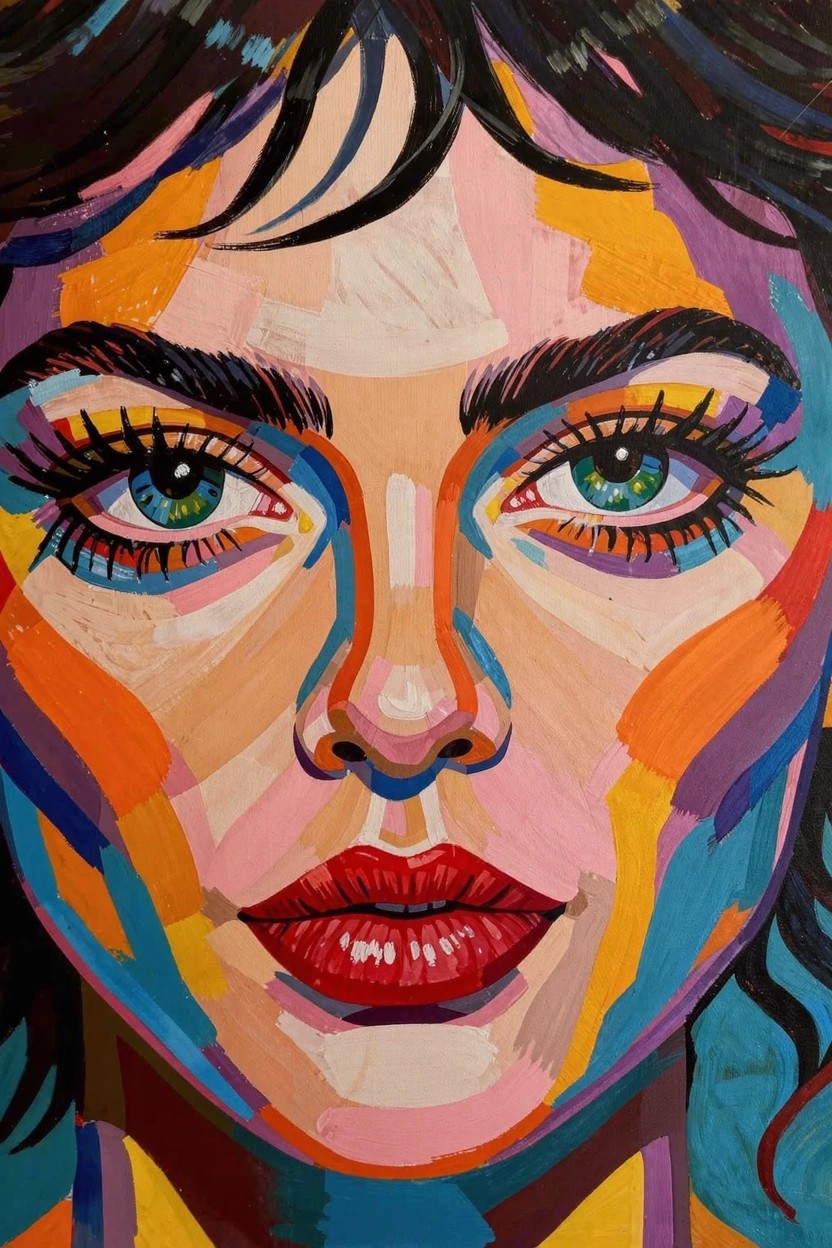
This acrylic painting idea builds a woman’s face from overlapping geometric shapes in bold pinks, yellows, blues, and oranges, turning a simple portrait into dynamic abstract art. Layered brushwork adds depth to the flat color blocks while sharp edges define features like the green eyes and red lips for instant recognition. The high contrast between warm and cool tones makes the composition pop without needing fine details.
The bold color blocks keep the focus sharp and make blending easier since acrylics dry fast for quick layering. Beginners can simplify by using fewer shapes or larger brushes, adapting the palette for personal skin tones or moods. These abstracts work great for canvas wall art that grabs attention on Pinterest with their punchy energy.
Vibrant Impasto Abstracts
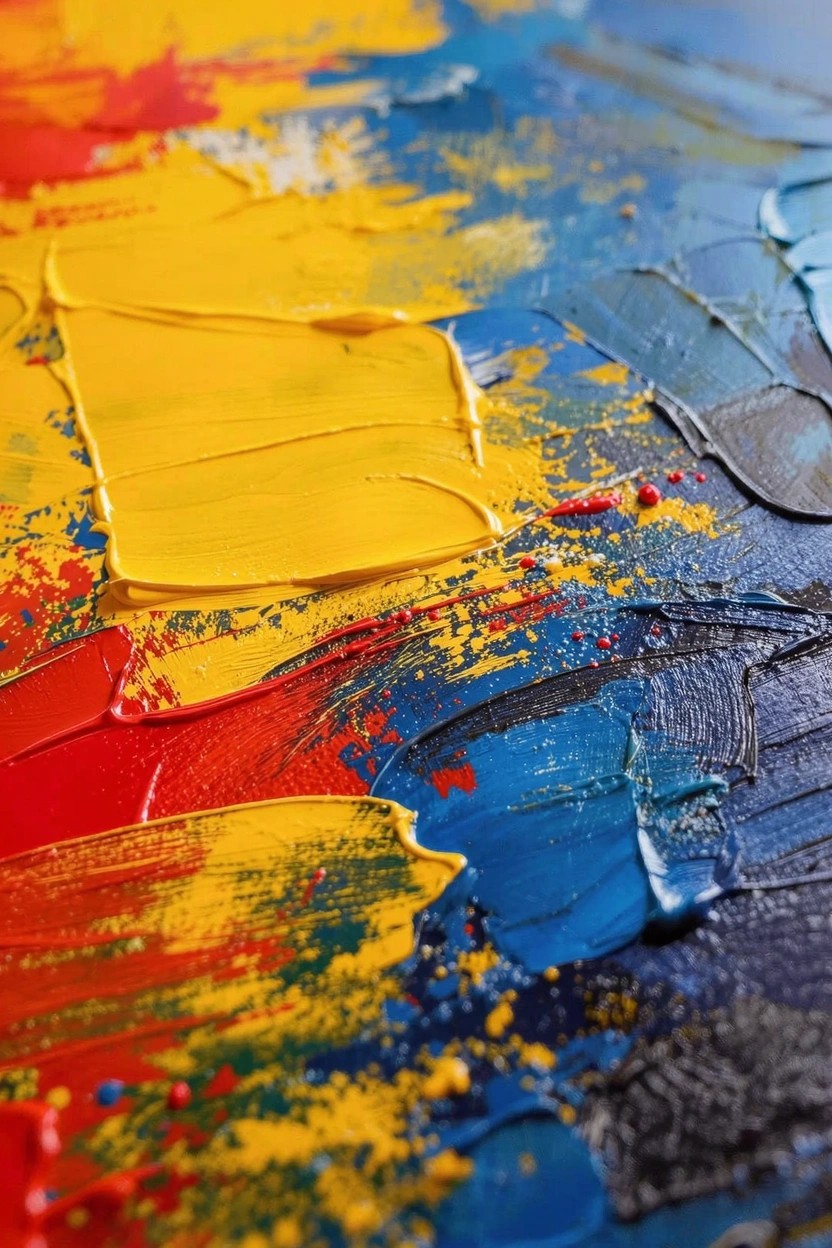
Layer thick acrylic paints in bold yellows, reds, and blues over dark underlayers to create energetic abstract compositions. Heavy impasto builds texture through visible ridges and peaks that add dimension and movement. Sharp color contrasts and subtle blends between shapes keep the focus dynamic without relying on realistic forms.
The bold contrast does a lot of the work here, letting loose brushwork deliver pro-level punch even for beginners. Scale it down for quick practice panels or up for statement wall art, swapping hues to match room decor. Textured abstracts like this grab attention on Pinterest where the layered depth pops in photos.
Layered Color Bands for Mountain Landscapes
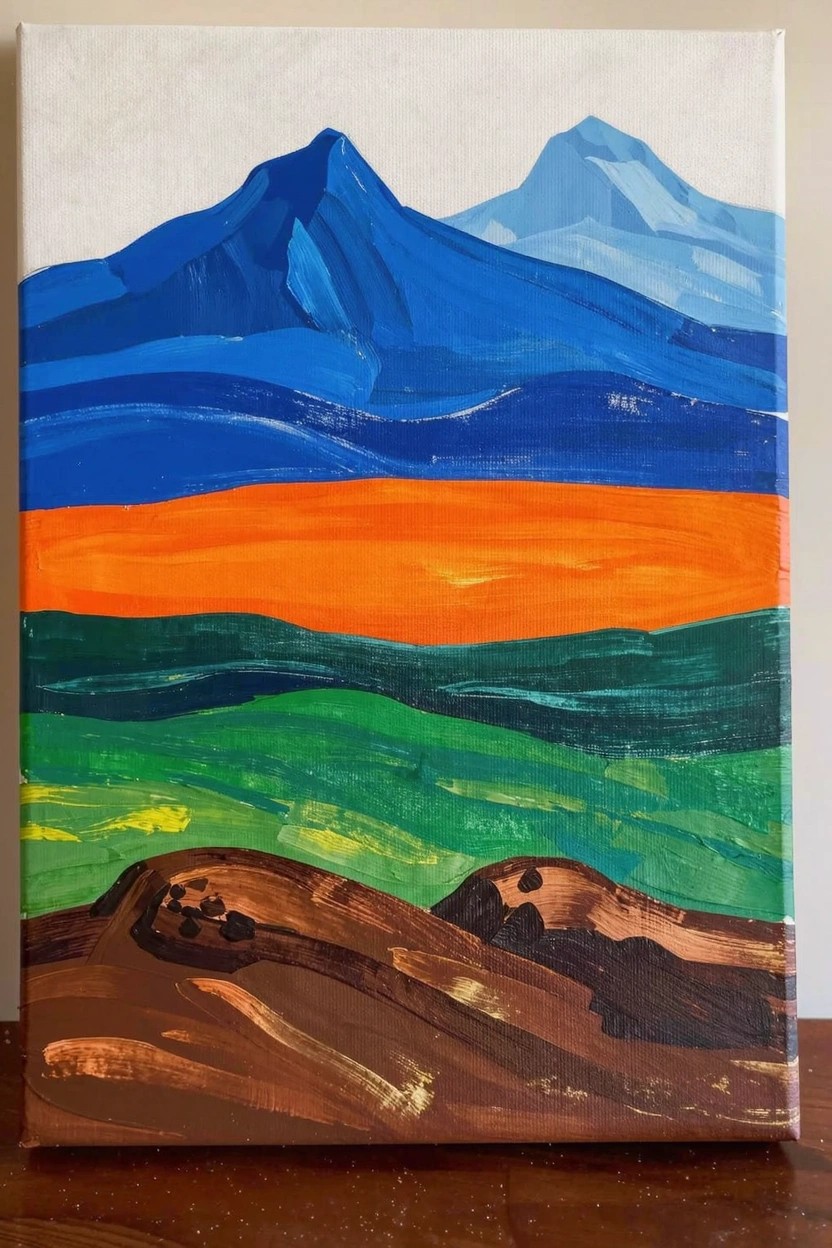
Stack broad horizontal bands of color to build a mountain landscape, starting with deep blue peaks that lighten toward the horizon, a vivid orange sunset layer, lush green fields, and textured brown foreground hills. High contrast between these flat yet blended layers creates instant depth and focal points through shape alone. This technique shines in the landscape category for its graphic simplicity and bold impact as wall art.
The bold color blocking does most of the visual work, making it approachable for beginners who can layer wet-on-dry without blending perfection. Swap the orange for purples at dusk or greens for dawn to adapt for seasonal pieces. Painters save this for practice because the stacked layout scales easily to any canvas size and pops on Pinterest as vibrant decor.
Boldly Colored Stylized Trees
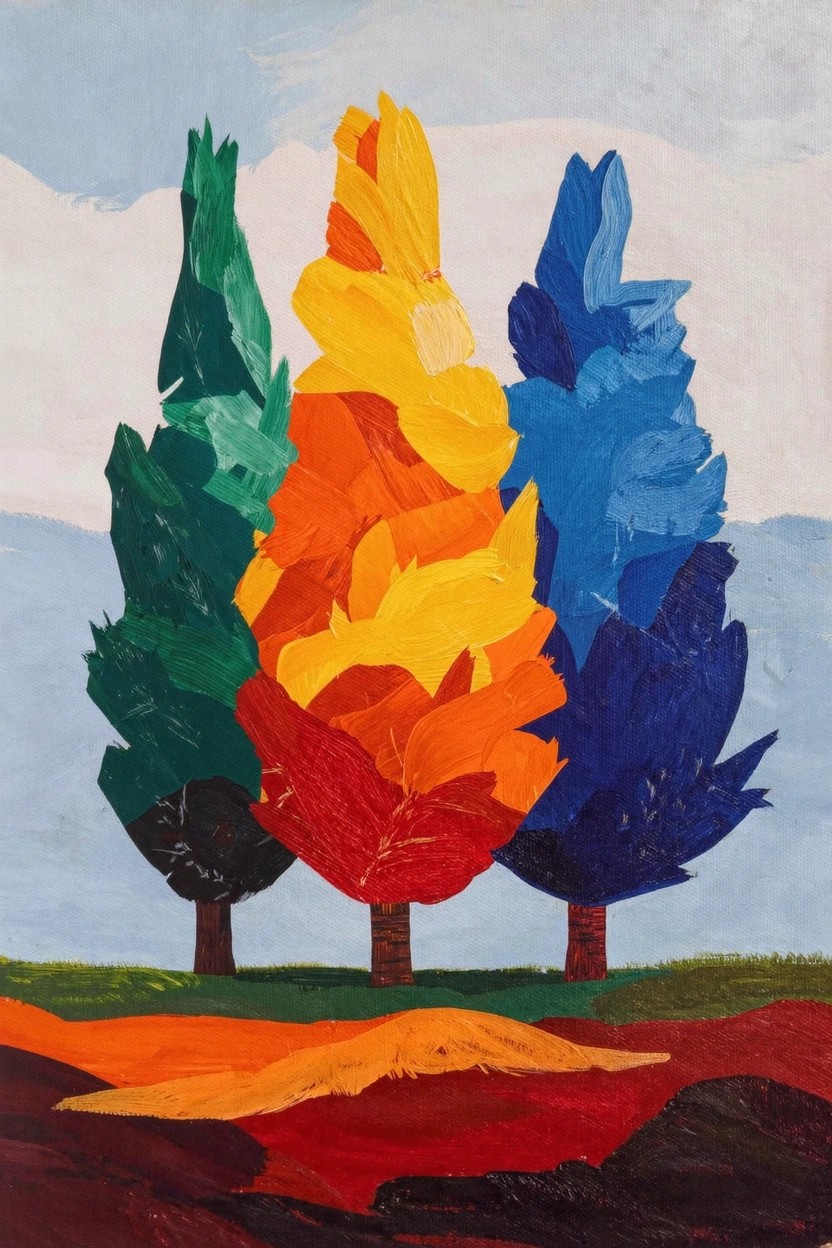
Three tall, flame-shaped trees in vivid green, fiery orange-yellow, and deep blue form the core of this acrylic landscape idea, set against a simple horizon line with sky and ground. The composition shines through its strong vertical shapes and high color contrast, which pulls the eye upward while thick, visible brushstrokes add texture without needing fine details. This fits as a decorative landscape that’s perfect for practicing bold layering on canvas.
The bold contrast between the trees and minimal background makes the painting pop even from across a room, ideal for quick wall art or seasonal decor. Acrylics handle the chunky impasto style well, so beginners can build color layers wet-on-wet for that textured look, then adapt hues for spring greens or autumn reds. Save this for Pinterest boards since the graphic simplicity scales up easily to larger canvases.
Frequently Asked Questions
1. What basic supplies do beginners need to apply these 21 techniques effectively? Start with affordable essentials: acrylic paints in a basic color set (primary colors plus white and black), synthetic brushes in various sizes (flat, round, and filbert for versatility), a palette (stay-wet or plastic for keeping paint moist), gesso-primed canvas panels or stretched canvas, water in a jar for thinning, paper towels, and medium (like acrylic retarder or glazing medium). These support techniques like wet-on-wet blending and layering without frustration. Invest in quality student-grade paints to avoid cracking, and always have a spray bottle for misting to extend working time.
2. How can beginners thin acrylic paint without making it too watery or weak? Use distilled water sparingly, adding just 1-2 drops at a time while stirring on your palette until it reaches a yogurt-like consistency. For better control and less cracking, mix in an acrylic medium (flow aid or retarder) at a 1:1 ratio with water. Test on scrap paper first. This technique improves flow for smooth washes and prevents brush marks, key for techniques like glazing and soft edges in the article.
3. What is the easiest way to blend colors smoothly before the paint dries? Work wet-on-wet: Apply wet paint side-by-side, then softly drag a clean, slightly damp brush or finger through the edge where colors meet, feathering back and forth. Add retarder medium to slow drying by 20-50%. Practice on a practice board with 2-3 colors. This builds on techniques 5-7 from the article, creating seamless gradients for skies or skin tones without muddy results.
4. How do I fix common mistakes like unwanted drips or harsh lines in acrylic paintings? While paint is still wet, lift excess with a dry brush or paper towel. For dried errors, lightly sand with fine-grit sandpaper (400+), wipe clean, then overpaint with thin layers. Use a wet sanding sponge for subtle fixes. Let each layer dry fully before adding more. This aligns with recovery techniques 12-14, saving your canvas and improving results without starting over.
5. How should beginners prepare their canvas for better paint adhesion and results? Apply 2 thin coats of gesso with a wide brush, sanding lightly between coats with 220-grit sandpaper for a smooth surface. Let it cure 24 hours. Tape edges if needed. This prep enhances techniques like impasto and detailing (techniques 18-21), prevents cracking, and ensures even color payoff, making your first layers professional-looking.